Our team just started using Replicon to record our time off, but wanted to have a nice calendar widget on our SharePoint page (or wherever) rather than having to log into Replicon each time.
At first I tried their API, but struggled with permissions and getting any time-off data out of it.
However, I did find a more straight forward way.. through the iCalendar feed! I’m posting my solution here for anyone else who might want to do this with the minimum of effort (but it does need some effort! ;).
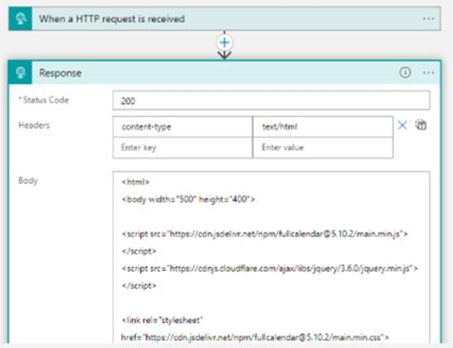
First off, you need to proxy the iCal data feed through something due to web (CORS) security.. so I’m doing that with a very simple Azure Logic App that grabs the feed & responds with the data.
Proxying the iCalendar Feed
This can then be consumed by our calendar JavaScript code, which takes the iCalendar data, reformats it to JSON, then tidies it to feed into a free JavaScript calendar called FullCalendar.
(you’ll need to edit the URL in the code to point at your iCalendar data proxy).
Once you’re happy with the code (in CodePen) you’ll need to host it on a webserver, then you can use the Embed component in SharePoint to get it onto your site page. To do this, I actually used another quick Azure Logic App, since it means I don’t need to have an actual web server.
I pasted all the code from the CodePen into a Response blog & boom, we have an easily-embedded calendar containing our team’s holidays!
Hosting the code in a Logic App
Hopefully this will help anyone else trying to do something similar, so you don’t have to start from scratch.
Back in 2015, Yahoo! shut down a service I used to love called Yahoo Pipes. It allowed you to combine and filter XML-based RSS feeds to create a new RSS feed containing the data you wanted.
At the time, I looked for a decent alternative and didn’t find anything.. until I realised that Logic Apps (a Microsoft Azure resource) were actually comparable to a next-gen version of Yahoo Pipes, with A LOT more functionality.
Since Logic Apps / Power Automate (used to be called Flow) is a lot more feature-rich, it does mean it’s initially a little harder to do what you want with the data, but once you’ve developed a few, you’ll see how much more flexible they are, especially when the world has moved to JSON-based APIs, with XML-based RSS taking a backseat.
While Pipes would just output RSS, Logic Apps can output the result into pretty much anything you want.. JSON, email, other APIs, Twitter, spreadsheets (Office 365 and Google Sheets).. the list goes on and on!
You can get started with Logic Apps for free.. and they’re very low cost to run beyond the Azure trial period. You’re talking pennies to run them monthly, depending on run-frequency & complexity. The pricing calculator can help you if you’re worried about cost. If you created 10 Logic Apps, each containing 10 basic actions and 10 standard actions, and ran them all once a day for 30 days it’d cost you 34p a month;
Actions in Logic Apps are the blocks you see in a flow;
It starts with a ‘Trigger’.. so in this case I’ve chosen a Recurrence (schedule), but you could set one up to trigger on a HTTP call from an RSS reader app, something happening on Twitter, or pretty much anything.. here’s a few of the triggers to choose from…
Just some of the Trigger actions available!
Non-Microsoft products are well represented, so don’t go thinking you’re limited to SharePoint or Office 365, that’s not the case.
You then design the flow how you want it to behave, e.g. get data from X and Y, merge it together, filter it, query an API, persist some data in a sheet, then send back a piece of JSON.
Choose from Built-In, Standard or Enterprise actions.. you can even build your own custom connectors for systems that aren’t currently listed.
List of the Built-In actions (April 2020)
As you’ll see in the video I put together, to replace Yahoo Pipes, you need to be able to merge, filter, manipulate, and sort JSON. You can do a lot of this with the built-in actions, but you can use Inline Code to achieve anything else.
The one thing that’s Logic Apps aren’t great for compared to Yahoo Pipes is sharing what you’ve created.. it was really easy to adapt what someone else made to suit your needs. Logic Apps don’t work like that at all, and you’ll need to roll your own, which takes some trial-and-error & patience.
Basic filtering (etc) is quite straightforward …
… but Inline Code might take you longer to figure out, so to get you started, here are some Inline Code snippets you might find useful;
Simple Text Filter
This file contains bidirectional Unicode text that may be interpreted or compiled differently than what appears below. To review, open the file in an editor that reveals hidden Unicode characters. Learn more about bidirectional Unicode characters
This file contains bidirectional Unicode text that may be interpreted or compiled differently than what appears below. To review, open the file in an editor that reveals hidden Unicode characters. Learn more about bidirectional Unicode characters
This file contains bidirectional Unicode text that may be interpreted or compiled differently than what appears below. To review, open the file in an editor that reveals hidden Unicode characters. Learn more about bidirectional Unicode characters
This hasn’t been a step-by-step guide, but has hopefully shown you enough to spark your interest.. get yourself a free trial of Azure, and give it a go!
Alerts are great for letting you know when Logic Apps or Function Apps fail to run for any reason.. the problem is, while you can list out which resources have Alerts, you can’t get a list of resources which don’t have Alerts!
So how do you find out which resources you need to add Alerts to? Well, the CLI has the tools you need, but it’s a bit more complicated than it should be!
First you need a list of resources which have alerts.. you can do that with a command like this;
az resource list --output tsv --resource-type "Microsoft.Insights/metricAlerts" --query [].id
You can run that as part of this command, which is supposed to take the Alert ID list, pipe it into az resource show, and output the value in properties.scopes[0], which is the ID of the resource the alert is set up to monitor.
az resource show --ids $(az resource list --output tsv --resource-type "Microsoft.Insights/metricAlerts" --query [].id) --query properties.scopes[0] --output tsv
However, this fails miserably when the Alert name has a space in it; there ends up being a space in the Alert ID, which makes our command throw an error. UPDATE – Microsoft are figuring out if they can fig it in this bug report I raised.
What I ended up having to do is break up the commands inside a Bash script & use a loop.
This file contains bidirectional Unicode text that may be interpreted or compiled differently than what appears below. To review, open the file in an editor that reveals hidden Unicode characters. Learn more about bidirectional Unicode characters
This will assign all the Alert IDs to a variable, then replaces spaces with ‘SPACEFIX’. We then loop over the Alert IDs, querying the Alert to find what resource they’re monitoring. ‘SPACEFIX’ is replaced within the loop. It’s somewhat of a hack to get round this silly issue!
There might be a better way to handle this, but I didn’t find it in a hurry.
Now we’ve got a list of resources that have alerting enabled, we need to list out all the resources we want to check.. for this example I’m just interested in Logic Apps, and this script will list them out, one resource per line;
This file contains bidirectional Unicode text that may be interpreted or compiled differently than what appears below. To review, open the file in an editor that reveals hidden Unicode characters. Learn more about bidirectional Unicode characters
Now we can redirect the output of the 2 scripts into temporary files, and use the ‘comm’ command to show us the lines that exist in one file that don’t in the other.. here’s how it looks;
This file contains bidirectional Unicode text that may be interpreted or compiled differently than what appears below. To review, open the file in an editor that reveals hidden Unicode characters. Learn more about bidirectional Unicode characters
This gets us what we want.. a list of Logic Apps that don’t have Alerts set up for them. You can pipe the results through grep to check certain Resource Groups, or whatever you need.
Hope this helps save you some time, and gives you a few ideas for useful scripts.
I’ve published some videos on YouTube showing various Azure tips, which you might want to check out!
For the website I’m responsible for, I was interested in capturing the data from the Google PageSpeed Insights tool, and having the data recorded somewhere on a schedule. There’s a blog post on Moz.com that talked about doing this with a Google Sheet, but it wasn’t quite what I was after; I wanted the data to be collected more regularly.
Instead of using Google Sheets (and a fair amount of code), I decided to use an Azure Logic App (you can use this or Microsoft Flow), which is part of Microsoft’s Cloud platform.
The Logic App is run on a Recurrence trigger which I set to every 6 hours. By collecting the results automatically over time, you’ll see how the changes you’re making to your site affect your PageSpeed scores.
Results from the API call are parsed out and pushed into a new row in an Excel Online sheet.
If you’re interested in setting this up yourself, I recorded a short video which shows how it works in more detail.
There are a few foibles in Logic Apps which caught me out, first, getting the list of URLs into an Array didn’t work as expected. I had to switch to Code View to correct the escaping of the return character to read;
@split(variables('urlList'), '\n')
The JSON payload from the PageSpeed API is pretty large, so I’ve listed the path to the elements you’ll be interested in below. I’m using split (on space) purely to get at the numerical value, which is more useful in the spreadsheet;
Overall, this was quite easy to put together and shows the power of Azure Logic Apps. Being able to do this without any code or (your own) servers, and getting things live in a couple of hours is a fantastic tool to have at your disposal.
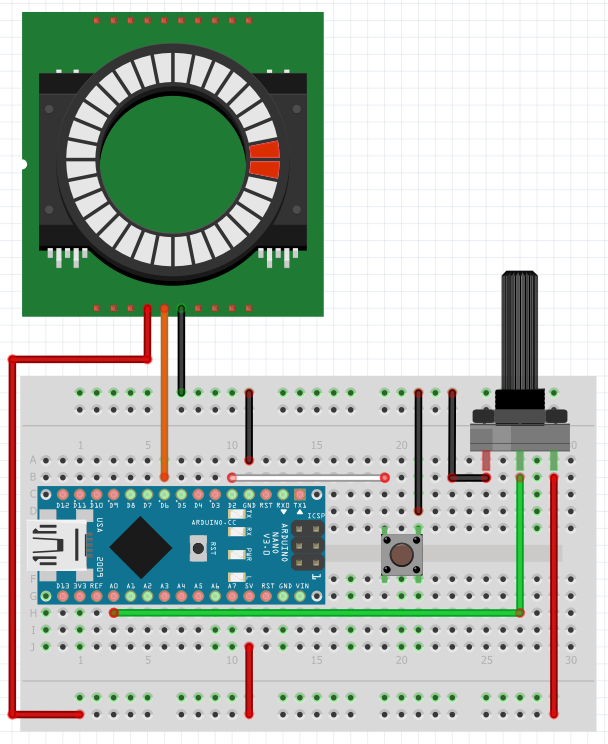
After clearing out some junk, which included an old halogen desk lamp, I was thinking about putting in an LED light behind the PC monitor.
Then I remembered I’d bought a ring of 24 RGB LEDs from Aliexpress last year & hadn’t used it in a project.
I also had a spare Arduino Nano, and all the things I’d need to allow me to hook up a dial (potentiometer) for the light level, and button to cycle through different colour modes.
Here’s a quick video of it in action..
Parts
LED Ring – £2
Arduino Nano – £1.75
Breadboard & bits – £1.25
Wiring it up
It’s an easy one to wire up.. I took a few basic examples and mashed them together to get what I wanted from the design.
I’m not an electronics expert, and approached this like I approach software development; write it in manageable/testable chunks, which I can implement and test individually, then bolt it all together.
The code for the project is pretty simple.. I think the most complicated bit is handling the button, which needed debounce functionality.
This file contains bidirectional Unicode text that may be interpreted or compiled differently than what appears below. To review, open the file in an editor that reveals hidden Unicode characters. Learn more about bidirectional Unicode characters
I’ve chosen to replace an ageing mini-PC which I’ve used since 2010 with a new Raspberry Pi 3 B+ running OSMC. It makes for a really capable media centre which can playback newer h.265 HEVC video files at 1080p without any problems, or it can serve 4K files over NFS to a box with a hardware h.265 chip like the Fire TV Box.
However, the one thing I’ve struggled with is how to make it easy for my family to use in regard to switching it on and off. The Pi doesn’t have a power button. Some power supplies have an inline rocker switch, which almost fits the bill. I wanted something more automated.
Fortunately I had a spare Energenie power socket from a previous project where I use one to turn off our bass speaker when the TV isn’t on. These power sockets are controlled remotely (over RF) from a Pi which you attach an Energenie control board/shield to.
What I’ve done with the Pi 3 is have it powered through an Energenie socket, and set up a service that executes when it detects OSMC is shutting down. That service will make a quick HTTP call to the Pi with the Energenie controller shield, which will in turn send an RF signal to turn the mains socket off.
Here’s how you can set it up like I have…
Scripts for the Pi running OSMC
First, add a new service script.. create a new file in this folder;
/etc/systemd/system/callenergenie.service
This file contains bidirectional Unicode text that may be interpreted or compiled differently than what appears below. To review, open the file in an editor that reveals hidden Unicode characters. Learn more about bidirectional Unicode characters
There are a couple of useful things happening in this service, the After parameter makes sure the code runs before the network code is shut down, and Conflicts parameter is looking for OSMC shutting down.
Now add a helper script… this will make the webserver call as a background task, so control will be given back to the service immediately, rather than it waiting for the wget to complete.
/home/osmc/callenergenie.sh
This file contains bidirectional Unicode text that may be interpreted or compiled differently than what appears below. To review, open the file in an editor that reveals hidden Unicode characters. Learn more about bidirectional Unicode characters
This calls the PHP script, telling it which socket to turn off, and how long to delay before sending the command, which we’re doing so that the Pi has time to shut down before the power is cut.
Scripts for the Pi with the Energenie shield
This is the PHP script I added to the other Pi which was already configured to be a PHP web server.
/var/www/html/callenergenie.php
This file contains bidirectional Unicode text that may be interpreted or compiled differently than what appears below. To review, open the file in an editor that reveals hidden Unicode characters. Learn more about bidirectional Unicode characters
To allow PHP to run the script as root, I needed to add the Apache user to the list of sudo-ers.. not that secure tho :( I’d be interested in anyone who knows how to run the Energenie scripts a regular user.. their Python doesn’t like it when it’s not root.
nano /etc/sudoers
www-data ALL=(ALL) NOPASSWD:ALL
The nice thing about the PHP script is that we can actually call it to turn the Pi on remotely too.. so you could configure that into a widget on your phone, or add it to Alexa.
There are a fair number of automated testing tools out there like Intern or Puppeteer, but I wanted something super simple and quick to set up to test a variety of pages on a site I develop.
I was making changes to JSON-LD, page metadata, and some of the data that’s sent to Omniture analytics. All the pages types are slightly different, containing things like Documents, Discussions, Blog Posts, landing pages, etc. So I needed to go to a variety of URLs on my local dev environment to see what certain DOM elements got set to, and check the contents of some JavaScript variables.
I’d then need to do the same checks against our Dev, Staging and Production servers to make sure they all looked correct there too.
After a bit of searching I came across FeatherTest which is fed a text file where you use JavaScript/jQuery to define & run the tests.
It’s very easy to set up tests, and the same test script file can be run against whatever site you’re looking at in your browser. For more info go here;
The output from FeatherTest goes into the console, so if you’re testing multiple pages, you’ll need to check the ‘Preserve Log’ option, otherwise you’ll lose the output as Chrome navigates between pages.
Tip 2 – Output Formatting
When writing scripts, I’d recommend colouring the console output, and prefixing each line with something easily identifiable. In my case I’m using ‘SUDO – ‘ and colouring the text orange.
You can then simply filter the console to just see your output;
When you’ve filtered the output, you can then save it to a file (right-click, save as..) and format it into shape.
I’ve found this really useful to monitor how my SEO data has improved as I’ve made changes, and to sanity check I’ve not broken anything between releases.
Tip 3 – Variable access
Some of the test scripts I’ve written needed access to variables defined in the scope of the main window.. FeatherTest can’t normally access these variables, so we need a helper function.
The helper function either needs baking into your site’s JavaScript, or you can inject it using an extension like TamperMonkey. Using TamperMonkey means you can use it on whatever site you want, not just ones where you’re able to install the function on.
My code adds an event listener that you can call from FeatherTest which you can request variable values from.
This is the TamperMonkey/GreaseMonkey script I use;
This file contains bidirectional Unicode text that may be interpreted or compiled differently than what appears below. To review, open the file in an editor that reveals hidden Unicode characters. Learn more about bidirectional Unicode characters
This file contains bidirectional Unicode text that may be interpreted or compiled differently than what appears below. To review, open the file in an editor that reveals hidden Unicode characters. Learn more about bidirectional Unicode characters
FeatherTest Script – Example 2 – Variable Access & JSON-LD
To access variables we’ll use the TamperMonkey function I posted above. We can also pull out any JSON-LD splats and present them quite nicely in the console output.
This file contains bidirectional Unicode text that may be interpreted or compiled differently than what appears below. To review, open the file in an editor that reveals hidden Unicode characters. Learn more about bidirectional Unicode characters
I’m finally done with Firefox. When I first started using Firefox, the add-ons were a game-changer & I loved how much extra functionality they added to my day-to-day work.
Today, Chrome dominates the market, is waaay faster, and at the end of 2017 Mozilla is changing the add-on framework so some of the ‘classic’ add-ons I use will cease to work.
The final straw was seeing how fast Chrome way for general browsing and content creation; so much snappier than Firefox. Maybe that’s down to an ageing Firefox user profile.. but, IMO, Chrome is the future.
To ease my transition from Firefox to Chrome I’m using a bunch of extensions that give me the features I’ve grown used to. I thought I’d list out what I’m using so that others might benefit from knowing they’re out there & how useful they can be.
Adblock Plus
Blocks adds. I’d tried uBlock.. but found it breaking a bunch of sites.. so back to this one I’ve used for years in Firefox.
Akamai debug headers
Makes it simple to see what’s happening with websites fronted by the Akamai CDN.
Cookie Inspector
Enables editing + adding of Cookies (I guess one day the Chrome devs will add this into the core app.. one day).
Downloads Router
Routes certain file types to certain folders. Bit of a faff to set up, but I find it useful for filing downloads into set folders.
Fauxbar
The Chrome omnibar isn’t great for finding URLs I had open hours/days ago (Firefox was brilliant). This sorts out that problem & does a pretty good job at indexing everything nicely.
In addition to that, it gives you a neat menu bar with shortcuts to a whole bunch of things; bookmarks, extensions, apps, options, etc. The configurable tiles for sites is super-handy too.
HostAdmin App
Quick and easy host file editor.. especially useful if you’re using proxy exceptions to speed up access to certain internal sites, and want to be able to configure or toggle the entries easily.
ModHeader
Modify browser headers. Useful for testing things like GeoIP.
Open IE
Adds in a context menu to open the current URL or link in other browsers (IE, Firefox, Opera, etc). Need an external helper program installing in Windows.
Page Monitor
Monitor web pages for changes.. works best when you set the Advanced option to look at a particular part of the page using CSS selectors.
Proxy SwitchyOmega
Set up multiple proxies and easily switch between them via the toolbar button.
SimpleUndoRecents
This will give you a button where you can undo the accidental closing of a tab. (TabMixPlus did something similar in Firefox).
Tampermonkey
Lets you run scripts against web pages each time you load the page.. essentially allowing you to alter the page after it renders. Super handy for removing or adding elements to the page. This extension is the equivalent to Greasemonkey on Firefox.
The Camelizer
Nothing to do with work.. but essential all the same. Lets you see the price history for products on Amazon.. and set alerts for price fluctuations.
Xmarks Bookmark Sync
Synchronise bookmarks between multiple browsers on multiple PCs.. even has version history in case you delete bookmarks by accident.
Honorary mention..
An extension called Postman would have made this list a few months ago.. but it’s moved to a stand-alone application for Windows + Mac. It’s another essential bit of kit for developers; if you’ve not checked it out, go take a look.
MIA…
That covers all but one of the Firefox add-ons I used to use. The one I still miss is Locationbar2, which I simply can’t find an equivalent for in Chrome.
It essentially makes each part of a site’s URL a clickable link.. which is super handy for quickly moving through a site’s structure.
If anyone spots something suitable, hit me up in the comments.
I’m going to build a home automation project which connects a Raspberry Pi to control my central heating. I wasn’t particularly happy ripping out all the existing controls, and wanted to piggyback onto them.. which helps if the Pi ever fails (I’ve still got the old controls to fall back on).
I also didn’t want to mess with the existing heating control board, so bought a duplicate unit (British Gas UP2) from eBay for about £12.. I can perfect the project on that, and install it when I’m ready.
This set of videos goes through each step of the project.. starting off with opening the control board, an overview of what I want to do, and testing out the changes.
Opening up the Control Panel
This was a bit tricky.. it wasn’t quite obvious which plastic clips needed pushing in to pull the board out.. if you were doing this on your actual panel (not an eBay-bought duplicate) then this video should help work out what you need to do to get into it without damaging anything.
Project Overview
Next up, I’ll quickly go over what I intend to do to piggyback onto the control board. There’s a project here which did exactly what I wanted to do. He’s not using a PiFace 2 like I intend to use, and he wants to be able to control the hot water as well, but everything else is the same.
Safety First – Masking off the High Voltage Area
In this second video, I’ll show how I’m masking off the high voltage area of the board to make it a bit safer when I’m testing things out. Obviously most of the time the board is off, but this helps keep things safer when it is on without the cover.
Identifying Solder Points
Luckily this blog gave me a good starting point, but it wasn’t clear where to get the status of the central heating.. I used a multimeter to find a spot which changed voltage when the system was on, and this diagram shows you what I found;
Soldering
Since I only needed 4 wires for this project (2 for the switch, and 2 for the system state), I took an old USB cable, cut the ends off, stripped the wires and soldered it to the board without much trouble.
Soldering Complete!
This shows the control board after the soldering has been completed.. it’s pretty simple soldering; the only tricky part was finding the points to connect to for the system state (on/off). I’ve stuck down some of the wires so that they don’t catch or get stuck underneath the control boards buttons.
Testing the Wiring
Now that I’ve done the soldering, I’m testing out the wiring.. seeing whether connecting the two wires for the switch turns the central heating on, and when it is on, whether we get voltage on the other two wires to indicate the system state.
Controlling from Software
I’ve now hooked it up to the Pi Face 2 board, which can be controlled with a few lines of Python to simulate a button press, and detect the state of the system.
With these basics in place, the rest of the control software can be written to do scheduling, bring in temperature readings, and allow the system to be controlled remotely.
The subwoofer we had in our home cinema setup died a few weeks ago, so I did my research and found a nice replacement. The only thing I didn’t spot was the fact it never goes into standby if there’s no signal (unlike the old one). I tried using some eco plugs which turn off peripherals when the TV was turned off.. but it learns the TV remote signals, and completely turns the TV off as well.. meaning that you have to hit the power button twice to turn the TV back on; that doesn’t work well with the Harmony all-in-one remote we use.
What I decided to do was buy an Energenie socket, which can be switched on/off wirelessly from a Raspberry Pi. The kit comes with 2 sockets and a transmitter to attach to the GPIO headers on the Pi, and costs about £20.
In my subwoofer scenario I basically want it switched on when the TV is on, and off when the TV is off. The TV has a Chromecast plugged into it which is visible on my local network. If you’ve got a Smart TV on your network, maybe that’ll be visible in the same way. So when the TV/Chromecast appear on the network, we know to switch on the power socket.
Here’s the small Energenie transmitter attached to the GPIO headers on my B+.. it’s pretty tiny and the case I’ve got still fits over the top. Notice the small hole where you can attach an aerial.. if you want extra range, then you’ll need to solder one on.. I added a 135mm wire, since the range I got out of it just wasn’t enough to get from the dining room cupboard to the living room.
To put this together, we can use the Raspberry Pi Network Spy code I wrote in my previous blog posts on element14;
All we need is a new PHP page that’ll call one of the functions we’ve already written.. we need a list of the MAC addresses that are currently visible on the network, then check whether the Chromecast is there. Once we know whether the TV/Chromecast is on or off, we then call a Python script that will turn the Energenie socket on/off.
Here’s the PHP;
arp-chromecast.php
The Python script could follow the Energenie example script, but there’s actually an even more simple Python package which I’ve used in this project. To install it I did the following;
Then I wrote this helper Python script (which we’ll call from PHP) that accepts a couple of parameters, like this callenergenie.py [on|off] [switch_number];
callenergenie.py
from energenie import switch_on, switch_off

import sys
if len(sys.argv)==1:
print ‘Please specify arguments like this callenergenie.py [on|off] [switch_number]’
print ‘eg. callenergenie.py on 1’
print ‘eg. callenergenie.py off 2′
else:
on_or_off = sys.argv[1]
which_switch = int(sys.argv[2])
if (on_or_off==’on’):
print ‘Switching on ‘, which_switch
switch_on(which_switch)
if (on_or_off==’off’):
print ‘Switching off ‘, which_switch
switch_off(which_switch)
Now that we’ve written the PHP & Python, all we need to do is run the PHP every minute to scan the network and do the switching. We’ll do this using another cron job;
I’ve recently bought a new Freeview HD box from 3view. It has a whole host of features and can be considered a “connected” device. As with most high-end set-top-boxes (STB) it pulls software firmware updates from the web, and I was interested to see where it went to get these updates & how it knew they were available.
I know about using tools to sniff network traffic, but have only done this to sniff traffic coming directly out of the PC I’m running the capture software on. Buying this 3view box gave me more of an inventive to expand my knowledge & figure out how to capture the traffic from other devices.
It was actually relatively easy. I decided to do a Machine in the Middle (MITM) ‘attack’ which was documented over at the Wireshark wiki.
In my case I didn’t have 2 network cards, but did have a laptop with one network card, and a wireless card. In Windows XP I bridged the NIC to the Wireless adapter, then plugged in a cross-over cable that linked the 3view box to my laptop. Then, after a bit of messing about with IP addresses it started working.. my 3view box was accessing my wireless router via my laptop.
Now that all the traffic from the 3view box was going via my laptop, all I then needed to do was fire up Wireshark & take a look at the packets.
Intercepting the traffic allowed me to see where the box was going for it’s updates, and the User Agent. That’s been documented over at the 3viewer community website I set up for 3view owners.
QR Codes are a useful way of getting data to your mobile phone using it’s built-in camera. They’re basically 2D barcodes that can carry things like URLs and contact details. On Android I’d recommend using the app called Barcode Scanner to read QR Codes.
There were instances where I wanted to open up a webpage with a long URL on my phone & didn’t want to go through the hassle of copying and pasting it into one of those online QR Code generators.
This bookmarklet for Firefox and newer versions of IE lets you create a QR Code for the page you’re on.. it’ll default to the current page, but you can also override this with something else (like a URL from your clipboard, or whatever).
Add a new bookmark to your toolbar, and set the URL to the code below (I’d have put the proper link on here but WordPress disables the Javascript);
Over the past few months I’ve worked on a couple of mobile applications for the iPhone and Android platforms. I’d looked at Phonegap some time before that, but determined that it wasn’t up to the job, but more recently I stumbled across Titanium from Appcelerator. The idea is that you code up your apps using HTML and Javascript. The Javascript calls the Titanium API to create things like lists, dialog boxes, and phone features such as geolocation.
Some of the advantages of using Titanium are:
– No need to learn Objective-C (iPhone) or Java (Android)
– Leverage existing HTML + Javascript skills
– Write one version of the code that can be deployed to both platforms
– Code is compiled up into native applications which are accepted in the App Store
– Potential to deploy to other platforms in the future (e.g. Blackberry, Symbian)
The level of support provided by the Appcelerator staff on the official forums is brilliant, and the tutorial videos are good for those who want to get an overview of creating apps without wading through documentation.
You’ll still need a Mac if you want to develop for the iPhone, because Titanium makes use of the iPhone SDK. But if you just want to do Android development then you can use Window or Linux as well.
Although you’ll be developing 1 set of code for both the iPhone and Android, you’ll probably want to customise the UI slightly differently for each platform. For example, Android apps often hide away items such as ‘Settings’ and ‘Help’ under the Menu button. It’s simple to code this kind of thing up:
	if (Titanium.Platform.name == 'android') {
		var menu = Titanium.UI.createMenu();
		menu.addItem("Help/About", function() {
			displayWindow('Help / About', 'window_about.html');
		}, Titanium.UI.Android.SystemIcon.HELP);
		Titanium.UI.setMenu(menu);
	} else {
		data.push({title:'Help / About',image:'tabicon_help.png', color:'#ffffff'});
	}
That code will create the Help/About option under a menu on Android, and add it to the home screen’s list on the iPhone. Simple.
Titanium is an awesome framework so if you’re considering developing for the iPhone and/or Android then I’d highly recommend you take a look.
Power Meter Plus has been getting a lot of coverage this month; it’s been mentioned on dozens of blogs and now in PC Pro magazine issue 172, in fact I think Lifehacker might have picked up on it from there & the blogs picked up on Lifehacker’s article.


 I’m going to build a home automation project which connects a Raspberry Pi to control my central heating. I wasn’t particularly happy ripping out all the existing controls, and wanted to piggyback onto them.. which helps if the Pi ever fails (I’ve still got the old controls to fall back on).


 QR Codes are a useful way of getting data to your mobile phone using it’s built-in camera. They’re basically 2D barcodes that can carry things like URLs and contact details. On Android I’d recommend using the app called
 Lifehacker is one of my daily visits, so it was brilliant to see that it had Power Meter Plus as the
You must be logged in to post a comment.