The Modern Yahoo Pipes Replacement … Azure Logic Apps!

Back in 2015, Yahoo! shut down a service I used to love called Yahoo Pipes. It allowed you to combine and filter XML-based RSS feeds to create a new RSS feed containing the data you wanted.

At the time, I looked for a decent alternative and didn’t find anything.. until I realised that Logic Apps (a Microsoft Azure resource) were actually comparable to a next-gen version of Yahoo Pipes, with A LOT more functionality.

Since Logic Apps / Power Automate (used to be called Flow) is a lot more feature-rich, it does mean it’s initially a little harder to do what you want with the data, but once you’ve developed a few, you’ll see how much more flexible they are, especially when the world has moved to JSON-based APIs, with XML-based RSS taking a backseat.

While Pipes would just output RSS, Logic Apps can output the result into pretty much anything you want.. JSON, email, other APIs, Twitter, spreadsheets (Office 365 and Google Sheets).. the list goes on and on!

You can get started with Logic Apps for free.. and they’re very low cost to run beyond the Azure trial period. You’re talking pennies to run them monthly, depending on run-frequency & complexity. The pricing calculator can help you if you’re worried about cost. If you created 10 Logic Apps, each containing 10 basic actions and 10 standard actions, and ran them all once a day for 30 days it’d cost you 34p a month;

Actions in Logic Apps are the blocks you see in a flow;

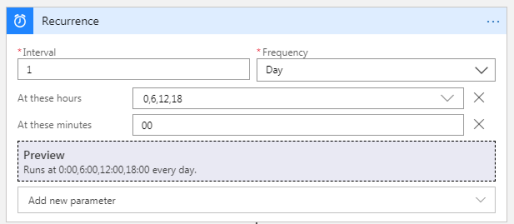
It starts with a ‘Trigger’.. so in this case I’ve chosen a Recurrence (schedule), but you could set one up to trigger on a HTTP call from an RSS reader app, something happening on Twitter, or pretty much anything.. here’s a few of the triggers to choose from…

Just some of the Trigger actions available!

Non-Microsoft products are well represented, so don’t go thinking you’re limited to SharePoint or Office 365, that’s not the case.

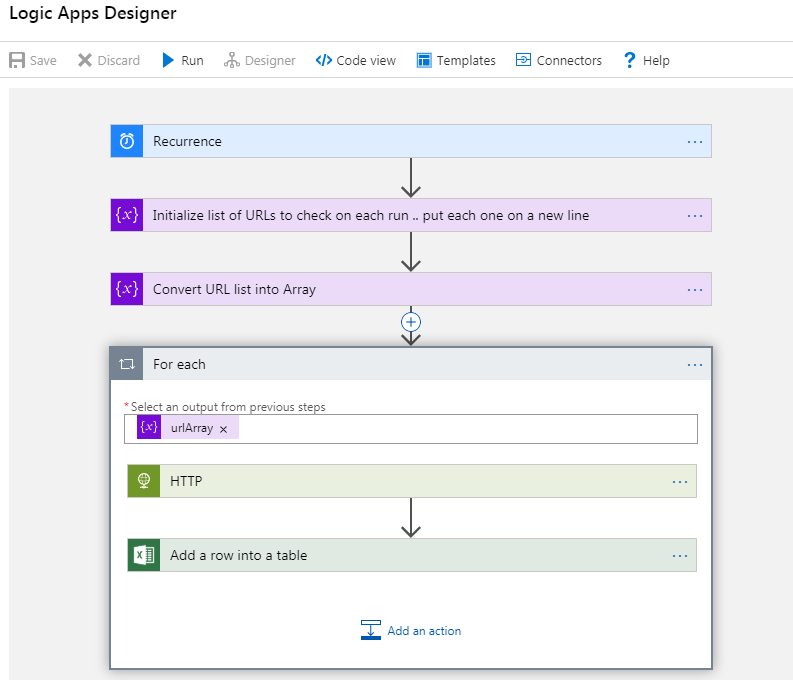
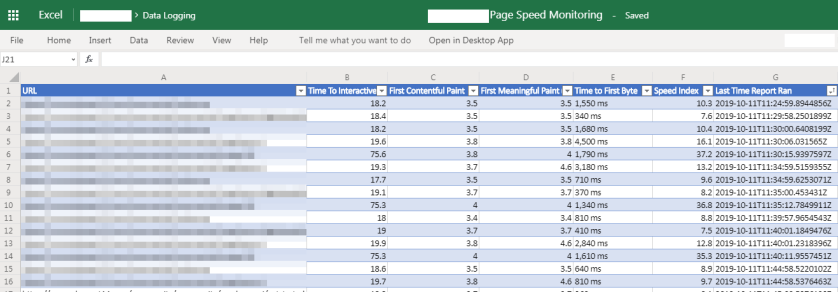
You then design the flow how you want it to behave, e.g. get data from X and Y, merge it together, filter it, query an API, persist some data in a sheet, then send back a piece of JSON.

Choose from Built-In, Standard or Enterprise actions.. you can even build your own custom connectors for systems that aren’t currently listed.

List of the Built-In actions (April 2020)

As you’ll see in the video I put together, to replace Yahoo Pipes, you need to be able to merge, filter, manipulate, and sort JSON. You can do a lot of this with theĀ  built-in actions, but you can use Inline Code to achieve anything else.

Inline Code runs NodeJS and has access to standard built-in JavaScript objects.

The one thing that’s Logic Apps aren’t great for compared to Yahoo Pipes is sharing what you’ve created.. it was really easy to adapt what someone else made to suit your needs. Logic Apps don’t work like that at all, and you’ll need to roll your own, which takes some trial-and-error & patience.

Basic filtering (etc) is quite straightforward …

… but Inline Code might take you longer to figure out, so to get you started, here are some Inline Code snippets you might find useful;

Simple Text Filter


const filtered = workflowContext.actions.Current_JSON.outputs.filter(item => item.display_name=='My search string');
return filtered;

Multi-Filter Example Including Regex


var titles = workflowContext.actions.Filter_array_on_year.outputs.body;
var newTitles = [];
const regex = /(.*)(2019|2020|2021).*/i; // Regex for year filtering
titles.forEach(function(item) {
// Additional filter for titles containing 1080p only
if (item.title.indexOf('1080p') > -1) {
// Extract the title and year only
var titleMatch = regex.exec(item.title);
if (titleMatch!=null && titleMatch.length>0) {
var tidyTitle = titleMatch[1]+titleMatch[2];
var pubDay = item.pubdate.substr(5, 2); // Get the day number
tidyTitle = pubDay + " – " + tidyTitle;
// Simple dedupe
if (!newTitles.includes(tidyTitle)) newTitles.push(tidyTitle);
} else {
newTitles.push(item.title);
}
}
});
return newTitles;

view raw

multiFilter.js

hosted with ❤ by GitHub

Generate HTML for an Email


var titles = workflowContext.actions.Execute_JavaScript_Code.outputs.body;
var html = '';
titles.forEach(function(fulltitle) {
var title = fulltitle.substr(5); // Strip off the first 5 characters.. '12 – Headline' becomes 'Headline'
html += fulltitle +
' | <a href="https://www.somesite.com/find?q='+title+'">Somesite</a>&#39; +
' | <a href="https://anothersite.net/search/'+title+'">Another</a>&#39; +
'<br>';
});
html += '<br><br>Footer of email goes here';
return html;

view raw

emailBody.js

hosted with ❤ by GitHub

This hasn’t been a step-by-step guide, but has hopefully shown you enough to spark your interest.. get yourself a free trial of Azure, and give it a go!

How to Automate PageSpeed Insights for Multiple URLs on a Schedule using Logic Apps or Flow

For the website I’m responsible for, I was interested in capturing the data from the Google PageSpeed Insights tool, and having the data recorded somewhere on a schedule. There’s a blog post on Moz.com that talked about doing this with a Google Sheet, but it wasn’t quite what I was after; I wanted the data to be collected more regularly.

Instead of using Google Sheets (and a fair amount of code), I decided to use an Azure Logic App (you can use this or Microsoft Flow), which is part of Microsoft’s Cloud platform.

The Logic App is run on a Recurrence trigger which I set to every 6 hours. By collecting the results automatically over time, you’ll see how the changes you’re making to your site affect your PageSpeed scores.

recurrence-hr

The first step simply defines the URLs you want to check, then it’ll loop over each one & call the PageSpeed API. Go get an API key, and make sure PageSpeed API is enabled.

Results from the API call are parsed out and pushed into a new row in an Excel Online sheet.

If you’re interested in setting this up yourself, I recorded a short video which shows how it works in more detail.

There are a few foibles in Logic Apps which caught me out, first, getting the list of URLs into an Array didn’t work as expected. I had to switch to Code View to correct the escaping of the return character to read;

@split(variables('urlList'), '\n')

The JSON payload from the PageSpeed API is pretty large, so I’ve listed the path to the elements you’ll be interested in below. I’m using split (on space) purely to get at the numerical value, which is more useful in the spreadsheet;

First Contentful Paint

@{split(body('HTTP')?['lighthouseResult']?['audits']?['first-contentful-paint']?['displayValue'], ' ')[0]}

First Meaningful Paint

@{split(body('HTTP')?['lighthouseResult']?['audits']?['first-meaningful-paint']?['displayValue'], ' ')[0]}

Speed Index

@{split(body('HTTP')?['lighthouseResult']?['audits']?['speed-index']?['displayValue'], ' ')[0]}

Time To Interactive

@{split(body('HTTP')['lighthouseResult']['audits']['interactive']['displayValue'], ' ')[0]}

Time to First Byte

@{split(body('HTTP')?['lighthouseResult']?['audits']?['time-to-first-byte']?['displayValue'], ' ')[3]}

Overall, this was quite easy to put together and shows the power of Azure Logic Apps. Being able to do this without any code or (your own) servers, and getting things live in a couple of hours is a fantastic tool to have at your disposal.

Basic Automated Testing using FeatherTest for Chrome

There are a fair number of automated testing tools out there like Intern or Puppeteer, but I wanted something super simple and quick to set up to test a variety of pages on a site I develop.

I was making changes to JSON-LD, page metadata, and some of the data that’s sent to Omniture analytics.Ā All the pages types are slightly different, containing things like Documents, Discussions, Blog Posts, landing pages, etc. So I needed to go to a variety of URLs on my local dev environment to see what certain DOM elements got set to, and check the contents of some JavaScript variables.

I’d then need to do the same checks against our Dev, Staging and Production servers to make sure they all looked correct there too.

After a bit of searching I came across FeatherTest which is fed a text file where you use JavaScript/jQuery to define & run the tests.

It’s very easy to set up tests, and the same test script file can be run against whatever site you’re looking at in your browser. For more info go here;

https://xaviesteve.com/5302/feathertest-automated-website-testing-extension-google-chrome/

Typical FeatherTest Script Structure + Syntax

Tip 1 – Preserve Log

The output from FeatherTest goes into the console, so if you’re testing multiple pages, you’ll need to check the ‘Preserve Log’ option, otherwise you’ll lose the output as Chrome navigates between pages.

Tip 2 – Output Formatting

When writing scripts, I’d recommend colouring the console output, and prefixing each line with something easily identifiable. In my case I’m using ‘SUDO – ‘ and colouring the text orange.

You can then simply filter the console to just see your output;

When you’ve filtered the output, you can then save it to a file (right-click, save as..) and format it into shape.

I’ve found this really useful to monitor how my SEO data has improved as I’ve made changes, and to sanity check I’ve not broken anything between releases.

Tip 3 – Variable access

Some of the test scripts I’ve written needed access to variables defined in the scope of the main window.. FeatherTest can’t normally access these variables, so we need a helper function.

The helper function either needs baking into your site’s JavaScript, or you can inject it using an extension like TamperMonkey. Using TamperMonkey means you can use it on whatever site you want, not just ones where you’re able to install the function on.

My code adds an event listener that you can call from FeatherTest which you can request variable values from.

e.g.

window.postMessage({ "action": "variable", "value": "myVar.hierarchy"}, window.origin);

This is the TamperMonkey/GreaseMonkey script I use;


// ==UserScript==
// @name FeatherTest Variable Support
// @namespace http://mysite
// @include http*://mysite/*
// @description Add support for FeatherTest variable access. Matt Collinge.
// @version 1.0
// @grant all
// ==/UserScript==
function featherTestSupport() {
if (typeof(window.addEventListener)!='undefined') window.addEventListener('message',function(event) {
// Make sure the request is coming from our own site (or FeatherTest)
if (event.origin !== window.origin) return;
if (typeof(event.data.action)=='undefined') return;
// Instead, I used this from StackOverflow; https://stackoverflow.com/questions/11924731/get-object-by-name-as-string-without-eval
if (event.data.action=='variable') {
var variableValue = event.data.value.split('.').reduce(function (object, property) {
return object[property];
}, unsafeWindow);
console.log('%c'+event.data.value+' = '+variableValue, 'color:orange');
}
},false);
}
featherTestSupport();

FeatherTest Script – Example 1 – DOM Lookup

Pulling data out of the DOM is straightforward;


'feathertest'
console.log('%cSUDO – HOMEPAGE', 'color:orange');
location.href = '/site_root/'
60000
console.log('%cSUDO – '+location.href, 'color:orange');
console.log('%cSUDO – meta_title = '+$('meta[name="title"]').attr('content'), 'color:orange');
console.log('%cSUDO – meta_og:title = '+$('meta[property="og:title"]').attr('content'), 'color:orange');
console.log('%cSUDO – meta_description = '+$('meta[name="description"]').attr('content'), 'color:orange');
console.log('%cSUDO – meta_og:description = '+$('meta[property="og:description"]').attr('content'), 'color:orange');
console.log('%cSUDO – meta_og:image = '+$('meta[property="og:image"]').attr('content'), 'color:orange');
console.log('%cSUDO – meta_keywords = '+$('meta[name="keywords"]').attr('content'), 'color:orange');
console.log('%cSUDO – ', 'color:orange');

FeatherTest Script – Example 2 – Variable Access & JSON-LD

To access variables we’ll use the TamperMonkey function I posted above. We can also pull out any JSON-LD splats and present them quite nicely in the console output.


'feathertest'
console.log('%cSUDO – HOMEPAGE', 'color:orange');
location.href = '/site_root/'
60000
console.log('%cSUDO – '+location.href, 'color:orange');
// Output JSON-LD on page
$('script[type="application/ld+json"]').each(function(index,json){ console.log('%cSUDO – '+JSON.stringify(JSON.parse(json.innerHTML),null,2), 'color:orange') });
// Output the contents of some JavaScript variables
window.postMessage({ "action": "variable", "value": "myVar.hierarchy"}, window.origin);
window.postMessage({ "action": "variable", "value": "myVar.channel"}, window.origin);
window.postMessage({ "action": "variable", "value": "currentContainer.name"}, window.origin);
console.log('%cSUDO – ', 'color:orange');


17 Extensions to help the transition from Firefox to Chrome

I’m finally done with Firefox. When I first started using Firefox, the add-ons were a game-changer & I loved how much extra functionality they added to my day-to-day work.

Today, Chrome dominates the market, is waaay faster, and at the end of 2017 Mozilla is changing the add-on framework so some of the ‘classic’ add-ons I use will cease to work.

The final straw was seeing how fast Chrome way for general browsing and content creation; so much snappier than Firefox. Maybe that’s down to an ageing Firefox user profile.. but, IMO, Chrome is the future.

To ease my transition from Firefox to Chrome I’m using a bunch of extensions that give me the features I’ve grown used to. I thought I’d list out what I’m using so that others might benefit from knowing they’re out there & how useful they can be.

Adblock Plus
Blocks adds. I’d tried uBlock.. but found it breaking a bunch of sites.. so back to this one I’ve used for years in Firefox.

Akamai debug headers
Makes it simple to see what’s happening with websites fronted by the Akamai CDN.

Awesome Screenshot
Full-page screenshots

Cookie Inspector
Enables editing + adding of Cookies (I guess one day the Chrome devs will add this into the core app.. one day).

Downloads Router
Routes certain file types to certain folders. Bit of a faff to set up, but I find it useful for filing downloads into set folders.

Fauxbar
The Chrome omnibar isn’t great for finding URLs I had open hours/days ago (Firefox was brilliant). This sorts out that problem & does a pretty good job at indexing everything nicely.

In addition to that, it gives you a neat menu bar with shortcuts to a whole bunch of things; bookmarks, extensions, apps, options, etc. The configurable tiles for sites is super-handy too.

HostAdmin App
Quick and easy host file editor.. especially useful if you’re using proxy exceptions to speed up access to certain internal sites, and want to be able to configure or toggle the entries easily.

LastPass
Excellent cross-device password manager.

ModHeader
Modify browser headers. Useful for testing things like GeoIP.

Open IE
Adds in a context menu to open the current URL or link in other browsers (IE, Firefox, Opera, etc). Need an external helper program installing in Windows.

Page Monitor
Monitor web pages for changes.. works best when you set the Advanced option to look at a particular part of the page using CSS selectors.

Proxy SwitchyOmega
Set up multiple proxies and easily switch between them via the toolbar button.

SimpleUndoRecents
This will give you a button where you can undo the accidental closing of a tab. (TabMixPlus did something similar in Firefox).

Tampermonkey
Lets you run scripts against web pages each time you load the page.. essentially allowing you to alter the page after it renders. Super handy for removing or adding elements to the page. This extension is the equivalent to Greasemonkey on Firefox.

The Camelizer
Nothing to do with work.. but essential all the same. Lets you see the price history for products on Amazon.. and set alerts for price fluctuations.

Web Developer
Handy tools for developers.

Xmarks Bookmark Sync
Synchronise bookmarks between multiple browsers on multiple PCs.. even has version history in case you delete bookmarks by accident.


Honorary mention..

An extension called Postman would have made this list a few months ago.. but it’s moved to a stand-alone application for Windows + Mac. It’s another essential bit of kit for developers; if you’ve not checked it out, go take a look.

MIA…

That covers all but one of the Firefox add-ons I used to use. The one I still miss is Locationbar2, which I simply can’t find an equivalent for in Chrome.

It essentially makes each part of a site’s URL a clickable link.. which is super handy for quickly moving through a site’s structure.

If anyone spots something suitable, hit me up in the comments.

Raspberry Pi Heating Controller ā€“ Part 2 – Software Architecture

One of the early design decisions for the Raspberry Pi powered heating controller was to have the Pi secured behind a firewall without direct access to it from the Internet. What I decided to do was have a set of simple PHP web pages on a remote web host that you can access from anywhere, and the Pi control server talks to that web host to send/receive data.

What I didn’t want was for the Pi to run a web server that ends up getting compromised & having the run of my home network.

arch-mode1
The Pi server and remote webspace need to be paired with an access key. Anyone accessing the remote site needs the correct access key to be able to control the system.. and the level of control is limited by the API we’ll put in place.. i.e. remote clients won’t have direct access to your internal network via an open port on your home router.

Of course, you could actually host the ‘remote’ part of this set up on your Pi and use port forwarding; the architecture allows for both types of access. The access key is still needed to control the system, but you’ll be more vulnerable to attacks on your Apache/PHP installation & need to keep up-to-date with software patches to help ensure your system is secure.

arch-mode2

QR Code Bookmarklet

QR Codes are a useful way of getting data to your mobile phone using it’s built-in camera. They’re basically 2D barcodes that can carry things like URLs and contact details. On Android I’d recommend using the app called Barcode Scanner to read QR Codes.

There were instances where I wanted to open up a webpage with a long URL on my phone & didn’t want to go through the hassle of copying and pasting it into one of those online QR Code generators.

This bookmarklet for Firefox and newer versions of IE lets you create a QR Code for the page you’re on.. it’ll default to the current page, but you can also override this with something else (like a URL from your clipboard, or whatever).

Add a new bookmark to your toolbar, and set the URL to the code below (I’d have put the proper link on here but WordPress disables the Javascript);

javascript:var%20sCode=prompt('Enter%20URL%20to%20encode',window.location);void(window.open('http://chart.apis.google.com/chart?cht=qr&chs=300x300&chl='+encodeURIComponent(sCode),'Qr%20code','top=100,left=200,width=350,height=350,status=yes'));

iPhone and Android development with Titanium

Over the past few months I’ve worked on a couple of mobile applications for the iPhone and Android platforms. I’d looked at Phonegap some time before that, but determined that it wasn’t up to the job, but more recently I stumbled across Titanium from Appcelerator. The idea is that you code up your apps using HTML and Javascript. The Javascript calls the Titanium API to create things like lists, dialog boxes, and phone features such as geolocation.

Some of the advantages of using Titanium are:

– No need to learn Objective-C (iPhone) or Java (Android)
– Leverage existing HTML + Javascript skills
– Write one version of the code that can be deployed to both platforms
– Code is compiled up into native applications which are accepted in the App Store
– Potential to deploy to other platforms in the future (e.g. Blackberry, Symbian)

The level of support provided by the Appcelerator staff on the official forums is brilliant, and the tutorial videos are good for those who want to get an overview of creating apps without wading through documentation.

You’ll still need a Mac if you want to develop for the iPhone, because Titanium makes use of the iPhone SDK. But if you just want to do Android development then you can use Window or Linux as well.

Although you’ll be developing 1 set of code for both the iPhone and Android, you’ll probably want to customise the UI slightly differently for each platform. For example, Android apps often hide away items such as ‘Settings’ and ‘Help’ under the Menu button. It’s simple to code this kind of thing up:

	if (Titanium.Platform.name == 'android') {
		var menu = Titanium.UI.createMenu();
		menu.addItem("Help/About", function() {
			displayWindow('Help / About', 'window_about.html');
		}, Titanium.UI.Android.SystemIcon.HELP);
		Titanium.UI.setMenu(menu);
	} else {
		data.push({title:'Help / About',image:'tabicon_help.png', color:'#ffffff'});
	}

That code will create the Help/About option under a menu on Android, and add it to the home screen’s list on the iPhone. Simple.

Titanium is an awesome framework so if you’re considering developing for the iPhone and/or Android then I’d highly recommend you take a look.

Creating a Netvibes / iGoogle Gadget for Multi-Image Display

To help make it as easy as possible for family members to see new pictures from the Collinge household I decided to set them up with Netvibes homepages, each containing a widget to display the latest photos from Picasa Web Albums. Picasa Web Albums provide an RSS feed that you can subscribe to which is a good start.. but I couldn’t find a way to display them just as I wanted.

The spec is to display the latest images, over as many columns as the user specifies.. and have the images resize to fit the width of the widget. They pretty much get displayed in a grid style layout.

Step 1) Get the URL for Picasa Web Albums (or whatever service you’re using) and make sure it works. The first gotcha here was that Picasa Web Albums has a limitation which means that images > 800px will not be embedded. They’ll result in a 404 File Not Found. To get around this, append ?imgmax=800 to the RSS’s URL.

Step 2) The feed for Picasa Web Albums is sorted in ascending date order.. I wanted it in descending date order so that the latest photos show first. To do this I chose to re-format the feed using Yahoo Pipes.. it’s a way of tinkering with a feed an invaluable for times when you need to do something simple like this.

Picasa gives you an Atom-based feed which seems to be causing a few issues with my code.. it basically makes the images go into a different node from the one I expected.. and I’ve been unable to work out exactly where it’s putting them. The best way around this is to simply run the RSS feed through a simple Yahoo Pipe; I’ve published one which sorts the images in date descending order. Use that and copy the RSS feed it generates.

Step 3) Create a new widget using UWA so that it works with Netvibes and iGoogle. This is relatively simple.. just requiring a bit of coding to make it happen. As usual I’ve tried to make the code as generic as possible & driven by user preferences. The user can specify which node in the JSON object (returned from the RSS feed) contains the image to display.. useful when dealing with non-standard image enclosures. It will default to the first enclosure at item.enclosures[0].url

The finished widget is published here.

<?xml version="1.0" encoding="utf-8"?>
<!DOCTYPE html PUBLIC "-//W3C//DTD XHTML 1.0 Strict//EN" "http://www.w3.org/TR/xhtml1/DTD/xhtml1-strict.dtd">
<html xmlns="http://www.w3.org/1999/xhtml" xmlns:widget="http://www.netvibes.com/ns/"  >
	<head>
		<title>Multi-Image Display</title>
		
		<meta name="author" content="Matt Collinge" />
		<meta name="email" content="do-not-email@mt2009.com" />
		<meta name="description" content="Display multiple images from an RSS feed. Useful for feeds like those from Picasa Web Albums" />
		<meta name="version" content="1.0" />
		<meta name="website" content="http://eco.netvibes.com/widgets/298784/multi-image-display" />

		<meta name="keywords" content="image, rss, picasa, web album, picture, multiple, display, grid" />
		<meta name="autoRefresh" content="15" />
		<meta name="apiVersion" content="1.2" />
		
		<link rel="stylesheet" type="text/css" href="http://www.netvibes.com/themes/uwa/style.css" />
		<script type="text/javascript" src="http://www.netvibes.com/js/UWA/load.js.php?env=Standalone"></script>
		
		<style type="text/css">
			.imageDisplay {
				margin:0;
				padding:0;
			}
		</style>
		
		<widget:preferences>
			<preference name="title" type="text" label="Title" defaultValue="Multi-Image Display" />

			<preference name="url" type="text" label="RSS Feed" defaultValue="" />
			<preference name="limit" type="range" label="Number of images to display" defaultValue="10" step="1" min="1" max="50" />
			<preference name="columns" type="range" label="Number of columns to use" defaultValue="2" step="1" min="1" max="8" />
			<preference name="imagenode" type="text" label="Node in RSS Feed Containing Image" defaultValue="item.enclosures&#91;0&#93;.url" />
		</widget:preferences>
	
		<script>
			var BasicRSSReader = {};
			 
			BasicRSSReader.feed = false;
			 
			widget.onLoad = function() {
				if (widget.getValue('url') === '' || widget.getValue('url') == undefined) {
					widget.setBody('Please edit the preferences and enter the URL of the RSS feed where you want to take images from.<br><br>. Use a feed re-formatter like Yahoo Pipes if you need to tinker with a 3rd party RSS feed.');
				} else {
					widget.body.addClassName('imageDisplay');
					widget.setTitle(widget.getValue('title'));
					UWA.Data.getFeed(widget.getValue('url'), BasicRSSReader.display);
				}
			}
			
			BasicRSSReader.display = function(feed) {
				var bodyHTML = '';
				if (feed) BasicRSSReader.feed = feed;
				
				var imageWidth = widget.body.getDimensions().width / widget.getValue('columns');
				var imageCount = 0;
				var columnCount = 0;
				
				bodyHTML += '<table border=0 cellpadding=0 cellspacing=0>';
				for(var i=0; i < BasicRSSReader.feed.items.length; i++) {
					var item = BasicRSSReader.feed.items&#91;i&#93;;
					
					if (imageCount >= widget.getValue('limit')) {
						bodyHTML += '</tr>';
						break;
					}
					
					if (columnCount == 0) {
						bodyHTML += '<tr>';
					}
					bodyHTML += '<td><a href="' + item.link + '"><img src="' + eval(widget.getValue('imagenode')) + '" width="' + imageWidth + '" /></a></td>';
					
					columnCount++;
					
					if (columnCount == widget.getValue('columns')) {
						columnCount = 0;
						bodyHTML += '</tr>';
					}
					
					imageCount++;
				}
				bodyHTML += '</table>';
				
				if (imageCount==0) bodyHTML = 'Unable to load feed.';
				widget.setBody(bodyHTML);
			}
		</script>			
	
	</head>
	<body>
		<p>Loading...</p>

	</body>
</html>

Netvibes UWA

Netvibes is a pretty awesome personal homepage web app. It’s very similar to iGoogle, but IMO it’s a lot more stable & a lot better looking. Netvibes offer a unified API that allows you to write using their API and deploy your gadget to multiple providers, such as iGoogle, Opera, iPhone, MacOSX and Vista.

I’ve been writing a gadget for my company but decided I also wanted one to take the first image out of an RSS feed and present so that it takes up all the space in the gadget. Useful for things like LOLcats. It was surprisingly simple to create.. so with some UWA coding, and a simple pipe at Yahoo Pipes, I’m now able to bring in the first image from a specified RSS feed.. assuming the image’s URL has been put into the item.content tag.

Here’s the finished gadget.. and the source code is below…

<?xml version="1.0" encoding="utf-8"?>
<!DOCTYPE html PUBLIC "-//W3C//DTD XHTML 1.0 Strict//EN" "http://www.w3.org/TR/xhtml1/DTD/xhtml1-strict.dtd">
<html xmlns="http://www.w3.org/1999/xhtml" xmlns:widget="http://www.netvibes.com/ns/"  >
	<head>
		<title>Single Image Display</title>
		
		<meta name="author" content="Matt Collinge" />
		<meta name="author_email" content="gadget@mattcollinge.co.uk" />
		<meta name="description" content="Display an image from the content section of the first item in an RSS feed. Useful for feeds like those from LOLCats. Use Yahoo Pipes to get the image URL (only) into the item.content tag." />
		<meta name="version" content="1.1" />
		<meta name="website" content="http://www.mattcollinge.co.uk/" />
		<meta name="keywords" content="image, rss, lolcats, single, full width" />
		<meta name="autoRefresh" content="15" />
		
		<link rel="stylesheet" type="text/css" href="http://www.netvibes.com/themes/uwa/style.css" />
		<script type="text/javascript" src="http://www.netvibes.com/js/UWA/load.js.php?env=Standalone"></script>
		
		<style type="text/css">
			.imageDisplay {
				margin:0;
				padding:0;
			}
		</style>
		
		<widget:preferences>
			<preference name="title" type="text" label="Title" defaultValue="Single Image Display" />
			<preference name="url" type="text" label="URL" defaultValue="" />
		</widget:preferences>
	
		<script>
			var BasicRSSReader = {};
			 
			BasicRSSReader.feed = false;
			 
			widget.onLoad = function() {
				if (widget.getValue('url') === '' || widget.getValue('url') == undefined) {
					widget.setBody('Please edit the preferences and enter the URL of the RSS feed where you want to take the image from.<br><br>The image URL must be in the item.content tag otherwise this will not work. Use feed a reformatter like Yahoo Pipes if you need to tinker with a 3rd party RSS feed such as LOLcats.');
				} else {
					widget.body.addClassName('imageDisplay');
					widget.setTitle(widget.getValue('title'));
					UWA.Data.getFeed(widget.getValue('url'), BasicRSSReader.display);
				}
			}
			
			BasicRSSReader.display = function(feed) {
				var feedList = 'Unable to load feed.';
				if (feed) BasicRSSReader.feed = feed;
				var item = BasicRSSReader.feed.items[0];
				feedList = '<img src="' + item.content + '" width="' + widget.body.getDimensions().width + '" />';
				widget.setBody(feedList);
			}
		</script>			
	
	</head>
	<body>
		<p>Loading...</p>
	</body>
</html>

Using JSLint with Notepad++

I’m doing a fair amount of development using the ExtJS framework. IE is a bit picky about getting JavaScript properly formatted (otherwise it refuses to render the page). That’s why I’ve found JSLint really useful for locating stray commas or semi-colons.

To make it a bit quicker to put the file contents in the JSLint box I decided to hook it up to the Run menu in Notepad++. However, the JSLint web page doesn’t allow us to pass in data to it. To get around this you can copy the HTML + JS files from the authors website an copy them locally. Once you’ve got them locally you can modify the source to allow the passing of data.. here’s the change I made to do it on my system:

jslint.php changes.. add this right near the end

<script src="javascript.js"></script>

You’ll then need a way to take the file contents and fire it off to the page. At first I tried passing the file contents via the GET request, but it’s limited in length. Also, Notepad++ won’t let you send the file contents via the Run command. In the end I chose to use a piece of VBScript to bring up the webpage in the default browser, and some JavaScript to read in the file & place it into the page.

launchJSLint.vbs

Set objFSO = CreateObject("Scripting.FileSystemObject")
Set objFile = objFSO.OpenTextFile(wscript.Arguments(0), 1)

Dim strCharacters

Do Until objFile.AtEndOfStream
    strCharacters = strCharacters + objFile.Read(1)
Loop

strCharacters = Escape(strCharacters)

Set objFileSystem = CreateObject("Scripting.fileSystemObject")
Set objOutputFile = objFileSystem.CreateTextFile("c:\progra~1\notepad++\jslint\javascript.js", TRUE)
objOutputFile.WriteLine("document.getElementById(""input"").value = unescape(""" & strCharacters & """);")

Dim wShell
Set wShell = CreateObject("WScript.Shell")
wShell.Run "c:\progra~1\notepad++\jslint\jslint.html", 9

Finally, this is the Run command you can use in Notepad++ to launch the script…

wscript "C:\Program Files\Notepad++\launchJSLint.vbs" "$(FULL_CURRENT_PATH)"

Full Podcast Download Automation

In my last post I chose Juice (formally known as iPodder) to keep me up-to-date with the latest podcasts. It downloads the latest episodes and sticks them into a folder when they’re complete. Since this runs on my server I don’t know when the download is ready, and I also have to plug in my MP3 player and copy them over manually.

In an Ideal World…

Wouldn’t it be great if I was notified when the download had completed and could simply plug in my MP3 player and the PC copied over the files automatically? There didn’t seem to be anything out there that automated things to this degree so I decided to roll my own. Here’s what should happen:

  • Podcast app downloads new episodes from the RSS feeds I’m subscribed to
  • Podcast app should update my ‘completed downloads’ RSS feed with the latest podcast (this feed is read on my desktop at work). This is achieved through a simple script that’s executed when the download completes.
  • If the podcast app doesn’t support scripts and you’d like to reorganise the downloaded files or run a script, then use File Mover as an intermediate step.
  • Detect when a USB storage device is inserted
  • Based on the USB device’s label, run a specific script, which in this case will move .mp3’s to my MP3 player, and move video episodes of Diggnation & Hak5 to a USB memory stick so that I can get them on my laptop with the minimum of fuss.

Basic flow


The New Application

Detecting a USB storage device and running a specific script based on it’s label isn’t something I found an application for. That’s when wrote my own app to do exactly that.

Like with most of my utilities, the program is quite simple, with the power coming from being able to fire off a script which you can do almost anything with. In this case I’ll write a simple script to copy over any .mp3 files onto my appropriately labelled MP3 player, and anything else goes onto my 2GB USB stick.

The new app is called USB Detect & Launch and is available here for download. It’s effectively a beta, so give it a try and let me know whether it works for you!

Putting It All Together

1) Install Juice (or whatever app you’re going to use to subscribe to podcasts with)

2) Add the RSS feeds for the podcasts you want into Juice. E.g. Diggnation has them listed on the right hand side of the page, just pick the type of file you want (MP3, WMV, Xvid, etc).

3) Set up the destination folder for the downloaded podcasts

4) Set up the download schedule so that new podcasts are automatically downloaded

If you want to use RSS to inform you of newly downloaded podcasts follow the next steps, otherwise skip to step 8.

5) Write a quick script to add a few lines into our ‘completed downloads’ RSS feed so you’ll know when a new podcast is available even when you’re not near your server.

6) Add the script to Juice. Note; if you’re using another app that doesn’t support scripts in this way, then you can easily use File Mover as an intermediate step.

7) Setup your LAMP/WAMP installation to use a PHP script that will generate the RSS feed of completed downloads. The PHP script parses the logfile written by the script in step 5 and makes it into a simple feed.

Back to the automation…

8 ) Install and configure USB Detect & Launch. For each USB device you want to sync to, build up a simple script using the volume name, and the script you want to execute when the device is inserted.

e.g.

label:PENDRIVE
exec:wscript “c:\backup.bat” “%1” “%2”

label:CREATIVE300
exec:wscript “c:\batch\copy-to-mp3-player.bat” “%1” “%2”

%1 is replaced by the drive letter of the attached device (e.g. e:\)
%2 is replaced by the volume label of the attached device (e.g. PENDRIVE)

9) Write the script that’s called from USB Detect & Launch. The scripts can be as complex as you need them. A simple example would be to copy all the files from one of your podcast folders to your MP3 player using a batch script like this:

rem backup.bat
rem —————————————-
rem USB Detect & Launch will put the drive
rem letter of the USB storage device into %1
rem —————————————-

copy /Y “c:\podcasts\hak5\*.*” %1

Or maybe using xcopy to move all the sub-folders (/S) over would be better. Xcopy’s other options (/M) also allow you to copy over files with the Archive attribute and can reset this attribute after the copy.. essentially only copying the files over once, whilst keeping a copy on your hard drive:

xcopy f:\podcasts %1podcasts /M /S /Y

For more advanced copying of files, try using Robocopy with the Robocopy GUI app to help build up the command’s parameters.

Test The Setup…

10) That’s it. Start up Juice, and start USB Detect & Launch.

Test the process by subscribing to a new feed of podcasts. Let Juice download the latest episode automatically. When the download has completed you should find the file added to your RSS feed:

At this point you can insert your USB device and it should be detected & your podcasts will be copied over using the batch script you’ve written.

Simple 8)