Replacing Samsung Steam Link with a Raspberry Pi 3 & audio issue solved!

On November 30th 2023, Samsung is set to actively remove the Steam Link app from their TVs, which is a huge shame since it works so well & allows us to stream games (like Drawful & Stick Fight) from the PC to the living room TV for the family to enjoy together.

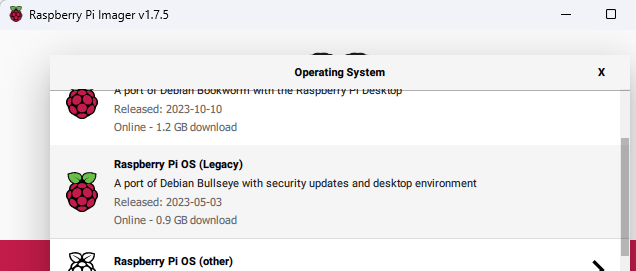
After moving to a Raspberry Pi 4 for my home server, I had a spare Pi 3, and read there’s a Steam Link client available for it. I set about installing the latest OS image, which is where the problems started. Long story short.. Steam Link doesn’t work on Debian Bookworm (loads of errors to do with ‘unmet dependencies‘ for libavcodec58)..

I eventually found that the ‘Legacy’ image of Debian Bullseye is what I needed, and Steam Link installed & ran without any messing (at first!).

If you’re looking for how to install steam link, check out Steam’s page here.

The interface looked fine, but when streaming a game, the image didn’t fit the TV properly. That was fixed by altering the Steam Remote Play options to ‘Change desktop resolution to match streaming client’;

The next problem was having no audio on the TV. Looking at the output it said ‘Mix_OpenAudioDevice() failed: alsa: Unsupported audio format‘.

The fix for this was to alter various settings in /boot/config.txt (maybe start with dtoverlay if you want to figure out exactly what fixes it for you).

$ sudo nano /boot/config.txt

------------------------------

# enable these
hdmi_force_hotplug=1
hdmi_force_edid_audio=1
hdmi_drive=2

# change this (add the 'f' to 'kms')
dtoverlay=vc4-fkms-v3d

# add this (stops Steam Link complaining.. nothing to do with audio)
gpu_mem=512

Reboot the Pi, then use sudo raspi-config -> System -> Audio and select HDMI.

You should find the audio now works & you should have a pretty good Steam Link streaming experience!!

One thing you may want to do is have the Pi automatically run Steam Link when it boots, to do this, use settings in raspi-config to automatically log the Pi into the console, then add this entry to crontab;

$ crontab -e

----------------

# add this to the file...
@reboot /usr/bin/steamlink

Congratulations! You should now have a Steam Link client on your Pi that works just as well as the Samsung app.

Use your iPad as a display for your games console, any HDMI device.. or endoscope!

iOS 17 added support for UVC (USB Video Class) input devices, so that any iPad with a USB-C port can use an external camera, including USB capture cards.

This opens up a world of opportunities to use your iPad as a portable display for things like a game console (Xbox, PlayStation, Nintendo Switch), a device like the Raspberry Pi (making it very handy for debugging issues with a normally headless server), or even a $4 endoscope you can find on AliExpress!

Here are a couple of videos that show this feature in action;

Unless you’re just using a USB C endoscope, you’ll need a cheap HDMI capture dongle which you can plug into the iPad’s USB C port. The adapter I use is available here on Amazon; https://amzn.to/34xv7Lk

In my testing so far, the apps show very little latency and are great for playing games through.

The apps you can use for this so far are;

Feel free to leave a comment with any other apps you find!

Installing SABnzbd on a Raspberry Pi running OSMC

For quite some time I’ve been running SABnzbd on a PC, downloading files, and then transferring them over the local network to a USB drive attached to a Raspberry Pi which is running OSMC. There’s a Linux version of SABnzbd which means I can cut out the PC and have the Pi handle the downloads. It’ll mean I can queue up the downloads from a web interface running on whatever device I have to hand, like an iPad.

First Try

The initial installation of SABnzbd was quite easy;

sudo apt-get install python-openssl unrar par2

sudo apt-get install sabnzbdplus

Edit the settings so that the web client starts up on port 8085..

sudo nano /etc/default/sabnzbdplus

USER=osmc
HOST=0.0.0.0
PORT=8085

sudo service sabnzbdplus restart

This then allowed me to connect to SABnzbd and transfer over all my settings that I was using on my PC.

Delayed Start

What I found was that SABnzbd started before the USB drive was properly mounted by OSMC, so I disabled the main service from starting up, and added a script to wait for the USB drive to get mounted at a particular path.

There was a good forum post here that pointed me in the right direction.

Disable the default service…

sudo update-rc.d sabnzbdplus disable

Write a quick shell script to wait for the directory/USB drive to be mounted…

nano /home/osmc/startsabnzb.sh

#!/bin/sh

# Wait for this folder to be mounted...
DIR=/media/Elements

while [ ! -d "$DIR" ]; do
sleep 120
done

/etc/init.d/sabnzbdplus start

chmod a+x /home/osmc/startsabnzb

Add the script to system startup…

sudo nano /etc/rc.local

/home/osmc/startsabnzb.sh

Upgrading

The version of SABnzbd that installed above was very dated. That repo doesn’t get updated very often. Here’s how I updated it to the latest version.

sudo su root

echo "deb http://ppa.launchpad.net/jcfp/nobetas/ubuntu xenial main" | tee -a /etc/apt/sources.list
echo "deb http://ppa.launchpad.net/jcfp/sab-addons/ubuntu xenial main" | tee -a /etc/apt/sources.list

apt-key adv --keyserver hkp://pool.sks-keyservers.net:11371 --recv-keys 0x98703123E0F52B2BE16D586EF13930B14BB9F05F

sudo apt-get update

Upgrading sabyenc

This solved the issue where SABnzbd was complaining that sabyenc wasn’t the right version. It uses the 2nd repo (sab-addons) we added in the steps above.

sudo apt-get install python-sabyenc

Final thoughts

SABnzbd runs quite well on the Pi. It is a lot slower than it was on a PC.. it only manages about 3 MB/s on the download on a wired connection (compared to 6 MB/s on a Wifi connection on a laptop), and unpacking is slow.

However, the files are unpacked onto the device which I was manually copying the files to anyway, so that saves time.

Sharing attached USB storage in OSMC using NFS

As well as being attached to the living room TV for use as a media centre, I also wanted to be able to use my Raspberry Pi 3 B+ as a simple NAS for other TVs in the house to stream from.

The Pi I’m using has a 1Tb desktop hard drive attached to it over USB, and I wanted a way to easily share the contents. It was actually relatively easy to set up… this is how to do it in OSMC;

  1. Install SSH to OSMC via the Store
  2. Now you can remote shell into the Pi to set up the network share
  3. Install NFS services using the following command;
    sudo apt-get install nfs-kernel-server
  4. Edit the file shares;
    sudo nano /etc/exports

    Add a share like this;

    /media 192.168.1.0/255.255.255.0(rw,fsid=0,insecure,no_subtree_check,async,crossmnt)

    (crossmnt fixed an issue where I could see the folders but no files)

  5. Restart the NFS service;
    sudo /etc/init.d/nfs-kernel-server restart

That’s it.. you should now be able connect to the Raspberry Pi and see the files on any of the USB drives you’ve got attached.

Automated mains socket power-off for OSMC on a Raspberry Pi

I’ve chosen to replace an ageing mini-PC which I’ve used since 2010 with a new Raspberry Pi 3 B+ running OSMC. It makes for a really capable media centre which can playback newer h.265 HEVC video files at 1080p without any problems, or it can serve 4K files over NFS to a box with a hardware h.265 chip like the Fire TV Box.

This form factor is easy to take on holiday and you can use an old infrared remote control (or Harmony learning remote) with it too.

However, the one thing I’ve struggled with is how to make it easy for my family to use in regard to switching it on and off. The Pi doesn’t have a power button. Some power supplies have an inline rocker switch, which almost fits the bill. I wanted something more automated.

Fortunately I had a spare Energenie power socket from a previous project where I use one to turn off our bass speaker when the TV isn’t on. These power sockets are controlled remotely (over RF) from a Pi which you attach an Energenie control board/shield to.

What I’ve done with the Pi 3 is have it powered through an Energenie socket, and set up a service that executes when it detects OSMC is shutting down. That service will make a quick HTTP call to the Pi with the Energenie controller shield, which will in turn send an RF signal to turn the mains socket off.


osmcshutdown


Here’s how you can set it up like I have…

Scripts for the Pi running OSMC

First, add a new service script.. create a new file in this folder;

/etc/systemd/system/callenergenie.service


[Unit]
Description=Energenie Remote Call to Secondary Pi
Before=multi-user.target
After=network.target
Conflicts=shutdown.target
[Service]
ExecStart=/bin/true
ExecStop=/bin/sh /home/osmc/callenergenie.sh
Type=oneshot
RemainAfterExit=yes
[Install]
WantedBy=multi-user.target

Then enable it with;

sudo systemctl enable callenergenie.service

There are a couple of useful things happening in this service, the After parameter makes sure the code runs before the network code is shut down, and Conflicts parameter is looking for OSMC shutting down.

Now add a helper script… this will make the webserver call as a background task, so control will be given back to the service immediately, rather than it waiting for the wget to complete.

/home/osmc/callenergenie.sh


echo Calling energenie socket…
wget –quiet –background –output-document="callenergenie.log" "http://192.168.1.99/callenergenie.php?delay=10&switch=2&state=off"
echo Sleeping for 2 seconds
sleep 2
echo Done.
exit 0

This calls the PHP script, telling it which socket to turn off, and how long to delay before sending the command, which we’re doing so that the Pi has time to shut down before the power is cut.

Scripts for the Pi with the Energenie shield

This is the PHP script I added to the other Pi which was already configured to be a PHP web server.

/var/www/html/callenergenie.php


<?php
/* MattC – Call this with various parameters..
callenergenie.php?
delay = time in seconds to sleep before calling Energenie
switch = which socket to talk to
state = turn socket on/off
e.g. callenergenie.php?delay=5&switch=2&state=off
*/
print ("Waiting ".$_GET['delay']." seconds");
sleep($_GET['delay']);
print ("Switching socket ".$_GET['switch']." ".$_GET['state']);
exec("sudo python /var/www/callenergenie.py ".$_GET['state']." ".$_GET['switch']);
?>

To allow PHP to run the script as root, I needed to add the Apache user to the list of sudo-ers.. not that secure tho :( I’d be interested in anyone who knows how to run the Energenie scripts a regular user.. their Python doesn’t like it when it’s not root.

nano /etc/sudoers

www-data ALL=(ALL) NOPASSWD:ALL

The nice thing about the PHP script is that we can actually call it to turn the Pi on remotely too.. so you could configure that into a widget on your phone, or add it to Alexa.

Adding IR Remote Control Support to the Raspberry Pi

In my last post I took you through how I created a small portable media centre that I can easily take on holiday to hook up to the hotel TV.

To reduce the amount space it took up, I used a cheap USB keypad which could be used to control the media center. It worked really well & having something hard-wired meant I didn’t have to worry about a Bluetooth-paired device needing re-pairing.

However, what I then realised was it would be good to be able to use a spare remote control instead. I was using the OpenElec distribution and looked through their documentation for how to do this, but only found references to version 3 of the software (it’s on version 7) and how to get LIRC working with it. There were plenty of blog posts on hooking up IR support, but a lot of them were written 2-3 years ago, and the software has moved on somewhat.

Hardware Setup

What I did first was buy a suitable IR receiver. I chose the Vishay TSOP4838 (which costs less than £1) because of the voltage range (2.5-5.5v) and receiver frequency (38KHz). If you look at the datasheet for the product, you’ll see which pins should get wired up to the Pi;

Simply wire pin 1 to GPIO 18, pin 2 to GND, and pin 3 to a 3.3v power pin, e.g.

By using some short F-F jumper wires and a small cut in the side of the case, I was able to position the reciever neatly(ish) on the side.. it’s still easily removable, but you could integrate it into the case a bit more seamlessly than this ;)

Software Setup

Before this project I was using OpenElec, but had limited success getting the IR support working properly. I switched to OSMC which I’d read had better IR support through the main UI. I think I was actually on the right track with OpenElec, but I realised later that the old vintage Xbox remote I was trying to use wasn’t 100% working.

If you’re going to use a remote control that’s officially recognised, then you can jump this part about learning IR remote control codes.

Learning IR remote commands

The remote I found in the loft was an old DVD player remote which (unsurprisingly) wasn’t in the list of pre-recognised remotes in the OSMC installation. I needed to get the Pi to learn the IR pulses being sent out by the remote and map them to the Kodi functions.

1. First off, you need to telnet to the Pi. Username: osmc, Password: osmc.

2. Next you need to stop the LIRC service which is being locked/used by Kodi

sudo systemctl stop lircd_helper@lirc0

3. Now you can run the IR learn mode.. this will record what it finds to the config file you specify;

irrecord -d /dev/lirc0 /home/osmc/lircd.conf

4. Follow the on-screen instructions which will recognise your remote.

One observation I had was that this only worked properly if I stopped after the first prompt to press lots of keys on the remote.. if I completed the second stage, the key mapping didn’t work, e.g.

If I ignored the second phase & let it abort, the learn process worked

When it’s working, you’ll be able to enter the Kodi function (like KEY_UP, KEY_DOWN, etc) & map it to a key press on your remote;

Once you’ve mapped all the functions you want, we then need to move back to OSMC and tell it to use that config file we’ve just written.

OSMC Settings

In OSMC you need to do the following;

1. Disable the CEC service (via System Settings > Input > Peripherals > CEC Adapter), which seems to be needed for LIRC to work.

2. Now go into OSMC settings and pick the Raspberry Pi icon

3. Go into Hardware Support and enabled LIRC GPIO Support. You shouldn’t need to change anything if you connected the sensor to GPIO 18.

4. Now go back and select the Remote Control option.

5. Ignore the list of pre-installed remotes and select Browse;

6. Navigate to the folder where LIRC wrote your config file;

7. Confirm the change & reboot the box;

That should be it.. your remote should be able to control everything in Kodi.

Portable Raspberry Pi Media Center

We recently went on holiday and I took my laptop & VGA cable with me. It was my intention to hook it up to the TV and play some media on it to keep the kids happy on rainy days. However, It turned out the TV had the VGA port covered up by the wall mounting bracket, and my laptop doesn’t have HDMI.. so we ended up putting the laptop on a chair and watching videos from there; it did the job, but wasn’t ideal.

At home we have a Fire TV Stick that could run Kodi, but the problem with Fire TV is that it has to have an internet connection, otherwise it doesn’t work (you can’t even get to Kodi!). Tethering it to my phone isn’t an option, since there are poor mobile signals in a lot of the places we visit.

Next time I’m going to be more prepared, with a more compact and flexible setup consisting of a Raspberry Pi 2 running OpenElec (and Kodi) together with a set of cables allowing me to hook it up to pretty much any TV. The Pi 2 runs Kodi really well, and the OpenElec distribution boots really quickly & has good Wifi and BlueTooth support. I initially chose a compact/travel USB-based keyboard instead of Bluetooth in case OpenElec ‘forgot’ the keyboard and I’d have nothing to navigate the menus to re-pair it.

Cable-wise, I’ve got a 1m standard HDMI cable, which will be fine in most situations.. with a 2m HDMI extension lead if I can’t get the Pi near enough to the TV (some accomodation doesn’t have power sockets where you’d expect them). I’ve also got a RCA lead, with a SCART adapter as well.. so that helps if we get stuck with an older TV.

For media storage I’ve gone with a USB3 Flash Drive with a capacity of 64Gb, which gives us more to play with than the microSD card, and it’s super-fast for copying media from a PC. As soon as you plug in the flash drive, Kodi will show it in the menus.

So that’s it.. nothing groundbreaking or overly difficult to put together. The whole system is small enough to fit in a small travel bag & gives us a lot of flexibility when dealing with different hotels/accommodation. You may just find the TV accepts the USB flash drive and can play back whatever is on it.. but at least you’ll have all the gear you need if it doesn’t ;)

After I made the video, I bought a USB numeric keyboard from eBay for a paltry £2.. that’s compacted the kit even further, allowing it to fit in an old camera bag.

The keypad isn’t instantly recognised by Kodi, but an easy way to get it up and running is to use the Keymap Add-on. Attach a normal USB keyboard and the keypad at the same time.. start the add-on and use the keyboard to activate the remap process. From there, it’s dead simple to map the keypad to the different Kodi functions.

Here’s the full kit list;

1 x Raspberry Pi 2
1 x 8Gb MicroSD card
1 x 2m HDMI extension cable
1 x 1m HDMI cable
1 x USB numeric keypad
1 x RCA to SCART adapter
1 x 3.5mm plug to RCA lead
1 x 64Gb USB3 Flash Drive
1 x USB power supply + cable

Update 1:

Just got back from a week at Center Parcs (Woburn) and was really pleased to find a HDMI socket on the wall, and a power socket.. it made it super easy to hook up the Pi to the TV :)

Update 2:

We spent a week near Blackpool, and the accommodation we stayed in had a patch panel as well! Seems like they’re quite common these days :)


Raspberry Pi Heating Controller – Part 2 – Software Architecture

One of the early design decisions for the Raspberry Pi powered heating controller was to have the Pi secured behind a firewall without direct access to it from the Internet. What I decided to do was have a set of simple PHP web pages on a remote web host that you can access from anywhere, and the Pi control server talks to that web host to send/receive data.

What I didn’t want was for the Pi to run a web server that ends up getting compromised & having the run of my home network.

arch-mode1
The Pi server and remote webspace need to be paired with an access key. Anyone accessing the remote site needs the correct access key to be able to control the system.. and the level of control is limited by the API we’ll put in place.. i.e. remote clients won’t have direct access to your internal network via an open port on your home router.

Of course, you could actually host the ‘remote’ part of this set up on your Pi and use port forwarding; the architecture allows for both types of access. The access key is still needed to control the system, but you’ll be more vulnerable to attacks on your Apache/PHP installation & need to keep up-to-date with software patches to help ensure your system is secure.

arch-mode2

Home Automation Project – Raspberry Pi Heating Controller – Part 1

pi-control
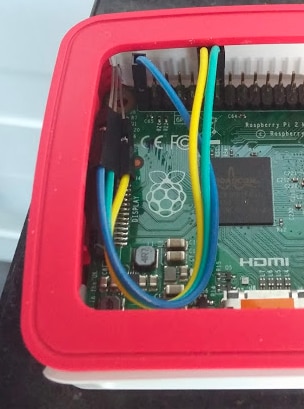
I’m going to build a home automation project which connects a Raspberry Pi to control my central heating. I wasn’t particularly happy ripping out all the existing controls, and wanted to piggyback onto them.. which helps if the Pi ever fails (I’ve still got the old controls to fall back on).

I also didn’t want to mess with the existing heating control board, so bought a duplicate unit (British Gas UP2) from eBay for about £12.. I can perfect the project on that, and install it when I’m ready.

This set of videos goes through each step of the project.. starting off with opening the control board, an overview of what I want to do, and testing out the changes.

Opening up the Control Panel

This was a bit tricky.. it wasn’t quite obvious which plastic clips needed pushing in to pull the board out.. if you were doing this on your actual panel (not an eBay-bought duplicate) then this video should help work out what you need to do to get into it without damaging anything.


Project Overview

Next up, I’ll quickly go over what I intend to do to piggyback onto the control board. There’s a project here which did exactly what I wanted to do. He’s not using a PiFace 2 like I intend to use, and he wants to be able to control the hot water as well, but everything else is the same.


Safety First – Masking off the High Voltage Area

In this second video, I’ll show how I’m masking off the high voltage area of the board to make it a bit safer when I’m testing things out. Obviously most of the time the board is off, but this helps keep things safer when it is on without the cover.


Identifying Solder Points

Luckily this blog gave me a good starting point, but it wasn’t clear where to get the status of the central heating.. I used a multimeter to find a spot which changed voltage when the system was on, and this diagram shows you what I found;

pi-heat-3

Soldering

Since I only needed 4 wires for this project (2 for the switch, and 2 for the system state), I took an old USB cable, cut the ends off, stripped the wires and soldered it to the board without much trouble.

pi-solder

Soldering Complete!

This shows the control board after the soldering has been completed.. it’s pretty simple soldering; the only tricky part was finding the points to connect to for the system state (on/off). I’ve stuck down some of the wires so that they don’t catch or get stuck underneath the control boards buttons.


Testing the Wiring

Now that I’ve done the soldering, I’m testing out the wiring.. seeing whether connecting the two wires for the switch turns the central heating on, and when it is on, whether we get voltage on the other two wires to indicate the system state.


Controlling from Software

I’ve now hooked it up to the Pi Face 2 board, which can be controlled with a few lines of Python to simulate a button press, and detect the state of the system.

With these basics in place, the rest of the control software can be written to do scheduling, bring in temperature readings, and allow the system to be controlled remotely.

Controlling Power Sockets using a Raspberry Pi

The subwoofer we had in our home cinema setup died a few weeks ago, so I did my research and found a nice replacement. The only thing I didn’t spot was the fact it never goes into standby if there’s no signal (unlike the old one). I tried using some eco plugs which turn off peripherals when the TV was turned off.. but it learns the TV remote signals, and completely turns the TV off as well.. meaning that you have to hit the power button twice to turn the TV back on; that doesn’t work well with the Harmony all-in-one remote we use.

What I decided to do was buy an Energenie socket, which can be switched on/off wirelessly from a Raspberry Pi. The kit comes with 2 sockets and a transmitter to attach to the GPIO headers on the Pi, and costs about £20.

In my subwoofer scenario I basically want it switched on when the TV is on, and off when the TV is off. The TV has a Chromecast plugged into it which is visible on my local network. If you’ve got a Smart TV on your network, maybe that’ll be visible in the same way. So when the TV/Chromecast appear on the network, we know to switch on the power socket.

energeniesockets

Here’s the small Energenie transmitter attached to the GPIO headers on my B+.. it’s pretty tiny and the case I’ve got still fits over the top. Notice the small hole where you can attach an aerial.. if you want extra range, then you’ll need to solder one on.. I added a 135mm wire, since the range I got out of it just wasn’t enough to get from the dining room cupboard to the living room.

energeniepi


To put this together, we can use the Raspberry Pi Network Spy code I wrote in my previous blog posts on element14;

Raspberry Pi Network Spy – Part 1 – Initial Setup + d/b Schema
Raspberry Pi Network Spy – Part 2 – D/b Setup + PHP for the scanner

All we need is a new PHP page that’ll call one of the functions we’ve already written.. we need a list of the MAC addresses that are currently visible on the network, then check whether the Chromecast is there. Once we know whether the TV/Chromecast is on or off, we then call a Python script that will turn the Energenie socket on/off.

Here’s the PHP;

arp-chromecast.php

The Python script could follow the Energenie example script, but there’s actually an even more simple Python package which I’ve used in this project. To install it I did the following;

sudo apt-get install python-pip
sudo pip install energenie

Then I wrote this helper Python script (which we’ll call from PHP) that accepts a couple of parameters, like this callenergenie.py [on|off] [switch_number];

callenergenie.py

from energenie import switch_on, switch_off
import sys

if len(sys.argv)==1:
print ‘Please specify arguments like this callenergenie.py [on|off] [switch_number]’
print ‘eg. callenergenie.py on 1’
print ‘eg. callenergenie.py off 2′
else:
on_or_off = sys.argv[1]
which_switch = int(sys.argv[2])

if (on_or_off==’on’):
print ‘Switching on ‘, which_switch
switch_on(which_switch)

if (on_or_off==’off’):
print ‘Switching off ‘, which_switch
switch_off(which_switch)

Now that we’ve written the PHP & Python, all we need to do is run the PHP every minute to scan the network and do the switching. We’ll do this using another cron job;

crontab -e

*/1 * * * * sudo /usr/bin/php /var/www/arp-chromecast.php


Project Mentions

This project of mine has been included in PC Pro magazine, and on one of my favourite tech podcasts, TekThing (at 22min 40sec in the video below)!