Raspberry Pi Heating Controller – Part 2 – Software Architecture

One of the early design decisions for the Raspberry Pi powered heating controller was to have the Pi secured behind a firewall without direct access to it from the Internet. What I decided to do was have a set of simple PHP web pages on a remote web host that you can access from anywhere, and the Pi control server talks to that web host to send/receive data.

What I didn’t want was for the Pi to run a web server that ends up getting compromised & having the run of my home network.

arch-mode1
The Pi server and remote webspace need to be paired with an access key. Anyone accessing the remote site needs the correct access key to be able to control the system.. and the level of control is limited by the API we’ll put in place.. i.e. remote clients won’t have direct access to your internal network via an open port on your home router.

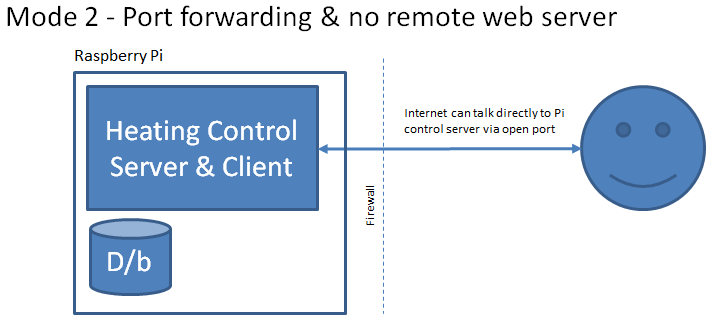
Of course, you could actually host the ‘remote’ part of this set up on your Pi and use port forwarding; the architecture allows for both types of access. The access key is still needed to control the system, but you’ll be more vulnerable to attacks on your Apache/PHP installation & need to keep up-to-date with software patches to help ensure your system is secure.

arch-mode2

Controlling Power Sockets using a Raspberry Pi

The subwoofer we had in our home cinema setup died a few weeks ago, so I did my research and found a nice replacement. The only thing I didn’t spot was the fact it never goes into standby if there’s no signal (unlike the old one). I tried using some eco plugs which turn off peripherals when the TV was turned off.. but it learns the TV remote signals, and completely turns the TV off as well.. meaning that you have to hit the power button twice to turn the TV back on; that doesn’t work well with the Harmony all-in-one remote we use.

What I decided to do was buy an Energenie socket, which can be switched on/off wirelessly from a Raspberry Pi. The kit comes with 2 sockets and a transmitter to attach to the GPIO headers on the Pi, and costs about £20.

In my subwoofer scenario I basically want it switched on when the TV is on, and off when the TV is off. The TV has a Chromecast plugged into it which is visible on my local network. If you’ve got a Smart TV on your network, maybe that’ll be visible in the same way. So when the TV/Chromecast appear on the network, we know to switch on the power socket.

energeniesockets

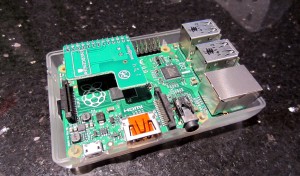
Here’s the small Energenie transmitter attached to the GPIO headers on my B+.. it’s pretty tiny and the case I’ve got still fits over the top. Notice the small hole where you can attach an aerial.. if you want extra range, then you’ll need to solder one on.. I added a 135mm wire, since the range I got out of it just wasn’t enough to get from the dining room cupboard to the living room.

energeniepi


To put this together, we can use the Raspberry Pi Network Spy code I wrote in my previous blog posts on element14;

Raspberry Pi Network Spy – Part 1 – Initial Setup + d/b Schema
Raspberry Pi Network Spy – Part 2 – D/b Setup + PHP for the scanner

All we need is a new PHP page that’ll call one of the functions we’ve already written.. we need a list of the MAC addresses that are currently visible on the network, then check whether the Chromecast is there. Once we know whether the TV/Chromecast is on or off, we then call a Python script that will turn the Energenie socket on/off.

Here’s the PHP;

arp-chromecast.php

The Python script could follow the Energenie example script, but there’s actually an even more simple Python package which I’ve used in this project. To install it I did the following;

sudo apt-get install python-pip
sudo pip install energenie

Then I wrote this helper Python script (which we’ll call from PHP) that accepts a couple of parameters, like this callenergenie.py [on|off] [switch_number];

callenergenie.py

from energenie import switch_on, switch_off
import sys

if len(sys.argv)==1:
print ‘Please specify arguments like this callenergenie.py [on|off] [switch_number]’
print ‘eg. callenergenie.py on 1’
print ‘eg. callenergenie.py off 2′
else:
on_or_off = sys.argv[1]
which_switch = int(sys.argv[2])

if (on_or_off==’on’):
print ‘Switching on ‘, which_switch
switch_on(which_switch)

if (on_or_off==’off’):
print ‘Switching off ‘, which_switch
switch_off(which_switch)

Now that we’ve written the PHP & Python, all we need to do is run the PHP every minute to scan the network and do the switching. We’ll do this using another cron job;

crontab -e

*/1 * * * * sudo /usr/bin/php /var/www/arp-chromecast.php


Project Mentions

This project of mine has been included in PC Pro magazine, and on one of my favourite tech podcasts, TekThing (at 22min 40sec in the video below)!

Using JSLint with Notepad++

I’m doing a fair amount of development using the ExtJS framework. IE is a bit picky about getting JavaScript properly formatted (otherwise it refuses to render the page). That’s why I’ve found JSLint really useful for locating stray commas or semi-colons.

To make it a bit quicker to put the file contents in the JSLint box I decided to hook it up to the Run menu in Notepad++. However, the JSLint web page doesn’t allow us to pass in data to it. To get around this you can copy the HTML + JS files from the authors website an copy them locally. Once you’ve got them locally you can modify the source to allow the passing of data.. here’s the change I made to do it on my system:

jslint.php changes.. add this right near the end

<script src="javascript.js"></script>

You’ll then need a way to take the file contents and fire it off to the page. At first I tried passing the file contents via the GET request, but it’s limited in length. Also, Notepad++ won’t let you send the file contents via the Run command. In the end I chose to use a piece of VBScript to bring up the webpage in the default browser, and some JavaScript to read in the file & place it into the page.

launchJSLint.vbs

Set objFSO = CreateObject("Scripting.FileSystemObject")
Set objFile = objFSO.OpenTextFile(wscript.Arguments(0), 1)

Dim strCharacters

Do Until objFile.AtEndOfStream
    strCharacters = strCharacters + objFile.Read(1)
Loop

strCharacters = Escape(strCharacters)

Set objFileSystem = CreateObject("Scripting.fileSystemObject")
Set objOutputFile = objFileSystem.CreateTextFile("c:\progra~1\notepad++\jslint\javascript.js", TRUE)
objOutputFile.WriteLine("document.getElementById(""input"").value = unescape(""" & strCharacters & """);")

Dim wShell
Set wShell = CreateObject("WScript.Shell")
wShell.Run "c:\progra~1\notepad++\jslint\jslint.html", 9

Finally, this is the Run command you can use in Notepad++ to launch the script…

wscript "C:\Program Files\Notepad++\launchJSLint.vbs" "$(FULL_CURRENT_PATH)"

Full Podcast Download Automation

In my last post I chose Juice (formally known as iPodder) to keep me up-to-date with the latest podcasts. It downloads the latest episodes and sticks them into a folder when they’re complete. Since this runs on my server I don’t know when the download is ready, and I also have to plug in my MP3 player and copy them over manually.

In an Ideal World…

Wouldn’t it be great if I was notified when the download had completed and could simply plug in my MP3 player and the PC copied over the files automatically? There didn’t seem to be anything out there that automated things to this degree so I decided to roll my own. Here’s what should happen:

  • Podcast app downloads new episodes from the RSS feeds I’m subscribed to
  • Podcast app should update my ‘completed downloads’ RSS feed with the latest podcast (this feed is read on my desktop at work). This is achieved through a simple script that’s executed when the download completes.
  • If the podcast app doesn’t support scripts and you’d like to reorganise the downloaded files or run a script, then use File Mover as an intermediate step.
  • Detect when a USB storage device is inserted
  • Based on the USB device’s label, run a specific script, which in this case will move .mp3’s to my MP3 player, and move video episodes of Diggnation & Hak5 to a USB memory stick so that I can get them on my laptop with the minimum of fuss.

Basic flow


The New Application

Detecting a USB storage device and running a specific script based on it’s label isn’t something I found an application for. That’s when wrote my own app to do exactly that.

Like with most of my utilities, the program is quite simple, with the power coming from being able to fire off a script which you can do almost anything with. In this case I’ll write a simple script to copy over any .mp3 files onto my appropriately labelled MP3 player, and anything else goes onto my 2GB USB stick.

The new app is called USB Detect & Launch and is available here for download. It’s effectively a beta, so give it a try and let me know whether it works for you!

Putting It All Together

1) Install Juice (or whatever app you’re going to use to subscribe to podcasts with)

2) Add the RSS feeds for the podcasts you want into Juice. E.g. Diggnation has them listed on the right hand side of the page, just pick the type of file you want (MP3, WMV, Xvid, etc).

3) Set up the destination folder for the downloaded podcasts

4) Set up the download schedule so that new podcasts are automatically downloaded

If you want to use RSS to inform you of newly downloaded podcasts follow the next steps, otherwise skip to step 8.

5) Write a quick script to add a few lines into our ‘completed downloads’ RSS feed so you’ll know when a new podcast is available even when you’re not near your server.

6) Add the script to Juice. Note; if you’re using another app that doesn’t support scripts in this way, then you can easily use File Mover as an intermediate step.

7) Setup your LAMP/WAMP installation to use a PHP script that will generate the RSS feed of completed downloads. The PHP script parses the logfile written by the script in step 5 and makes it into a simple feed.

Back to the automation…

8 ) Install and configure USB Detect & Launch. For each USB device you want to sync to, build up a simple script using the volume name, and the script you want to execute when the device is inserted.

e.g.

label:PENDRIVE
exec:wscript “c:\backup.bat” “%1” “%2”

label:CREATIVE300
exec:wscript “c:\batch\copy-to-mp3-player.bat” “%1” “%2”

%1 is replaced by the drive letter of the attached device (e.g. e:\)
%2 is replaced by the volume label of the attached device (e.g. PENDRIVE)

9) Write the script that’s called from USB Detect & Launch. The scripts can be as complex as you need them. A simple example would be to copy all the files from one of your podcast folders to your MP3 player using a batch script like this:

rem backup.bat
rem —————————————-
rem USB Detect & Launch will put the drive
rem letter of the USB storage device into %1
rem —————————————-

copy /Y “c:\podcasts\hak5\*.*” %1

Or maybe using xcopy to move all the sub-folders (/S) over would be better. Xcopy’s other options (/M) also allow you to copy over files with the Archive attribute and can reset this attribute after the copy.. essentially only copying the files over once, whilst keeping a copy on your hard drive:

xcopy f:\podcasts %1podcasts /M /S /Y

For more advanced copying of files, try using Robocopy with the Robocopy GUI app to help build up the command’s parameters.

Test The Setup…

10) That’s it. Start up Juice, and start USB Detect & Launch.

Test the process by subscribing to a new feed of podcasts. Let Juice download the latest episode automatically. When the download has completed you should find the file added to your RSS feed:

At this point you can insert your USB device and it should be detected & your podcasts will be copied over using the batch script you’ve written.

Simple 8)