An extension I used for years was called Fauxbar, which used an algorithm to create a much better (and fuller) experience when typing in a site you know you visited & want to return to.
Unfortunately, Fauxbar made extensive use of WebSQL, which was deprecated in newer versions of Chrome (hidden under a feature flag) and removed entirely from Chrome 123. It’s complex extension, and difficult to migrate to Manifest V3.. I had a brief try, but it was too much for me to tackle as a hobby project.
However, in some brief experiments with writing my first Chrome Extension, I found that the Chrome API is actually pretty good at searching your browse history (using chrome.history.search), and it’s really straight forward to present the results in the omnibar (using chrome.omnibox.onInputChanged).
This is when OmniHistoryPlus was born & is a great replacement for Fauxbar.
You activate it from the omnibar by typing ‘f’ followed by a tab or space, then you just search for a site you’ve visited; the results are more complete than you’d get from Chrome, and not muddied by web search results.
Microsoft have a programme called Microsoft Rewards, which allows you to earn points for various (very simple & quick) activities; there are daily tasks, searching using Bing, and reading news articles.
This video shows you the app I use, how many points you can expect to earn, and how long it should take to save enough to redeem a Game Pass.
Google One is a subscription service which gives you extra Cloud storage, as well as a few other perks such as a basic VPN. If you have a family, you can share the subscription benefits with them for no extra cost, which is quite nice.
The first tier of Google One gives you 100Gb of storage for £15.99 (GBP) a month, which isn’t too bad, but free is better, right?!
You can actually get it for free using a combination of Google Opinion Rewards and Google Play Weekly Prizes.
The Google Opinion Rewards app lets you earn rewards for sharing your opinions through short surveys, often based around shops you’ve visited.. be totally honest; if it catches you lying it’ll realise & reduce the number of surveys it gives you!
One of the more recent additions to Google Opinion Rewards are Receipt Tasks, which ask you to take a picture of a receipt from a particular store you visited; it certainly prefers certain stores over others.. I can bet it’ll ask for a Coop receipt, but it never wants one from my work cafeteria.
Here’s how much I’ve earned in Google Opinion Rewards over the past 9 months;
The other app where you can earn Play credit is via the Google Playapp itself.. take a look in your Points and you’ll find a tab called Perks where you can tap to get a weekly prize; they say you could win up to 100 points, but I’ve never got more than about 6. You can cash in 100 points for £1.
Here’s how much I’ve earned in Google Play Weekly Prizes over the past 9 months;
This video goes into everything in a bit more detail; please give me a Like if you’ve found this helpful!
Squid is a popular open-source proxy that can be configured to block adverts. I run it on a Raspberry Pi & have my iPad Air and Samsung Galaxy S21 Ultra configured to use the proxy when connected to my Wifi at home. There are good articles on the web which show you how to set all this up, so I won’t go over it in this post.
One thing I needed was a way to easily turn the ad-blocking off & back on, since blocking ads sometimes breaks sites or links to sites (especially affiliate tracking links).
You can of course go into the network settings & remove the proxy configuration, then put it all back after you’re done, but this is a pain & I really wanted a 1-tap solution which would work on iOS & Android.
First, I wrote a bash script which would toggle the ads on/off.. this works by emptying/populating the adblock.txt file that Squid consumes & telling Squid to re-read it. Here’s the script I came up with;
Testing this from a command prompt worked, so the next thing I needed to do was be able to trigger it from a web server call. My Raspberry Pi already has Apache & PHP running, so that was the natural place to create a quick PHP page that executes the bash script;
The last thing I needed to give permission for the web service to run the bash script, which uses visudo to allow the ‘www-data’ user to run it. Now, I realise this isn’t ideal, but I couldn’t find a better solution; please understand the security risks of doing this if you’re going to follow this guide.
Testing this in a web browser worked, so next I could move on to triggering it from my iPad and Android phone.. I could just go to the page in a browser, but that felt a bit clunky & there are nicer ways to do this! :)
Shortcuts on iOS
‘Shortcuts’ is a really nice automation app that’s built into iOS; with just 2 steps, I can call the PHP page & output the result into a native popup notification. Here’s how it looks;
The shortcuts can be added to the slide-out widget panel in iOS, which make it really convenient to access!
Running the shortcut will display a notification like this;
Automate on Android
There isn’t a built-in equivalent of ‘Shortcuts’ on Android, but I do have Automate, which I’ve previously used in projects I’ve blogged about on here.
Here’s how the ‘Flow’ looks;
The HTTP Request block needs to save the output to a variable, like this;
And the Toast notification can then display what’s in the variable like this;
You can add the Flow to your home screen as a shortcut (via Automate, or through Widgets), and when you tap it you’ll see a notification like this;
And there you have it! An easy way to toggle ad-blocking on your phone or tablet. Those apps on iOS and Android open up a world of opportunities to integrate with other systems & do some really neat stuff.
On November 30th 2023, Samsung is set to actively remove the Steam Link app from their TVs, which is a huge shame since it works so well & allows us to stream games (like Drawful & Stick Fight) from the PC to the living room TV for the family to enjoy together.
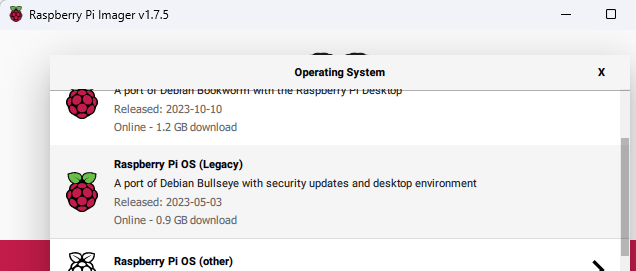
After moving to a Raspberry Pi 4 for my home server, I had a spare Pi 3, and read there’s a Steam Link client available for it. I set about installing the latest OS image, which is where the problems started. Long story short.. Steam Link doesn’t work on Debian Bookworm (loads of errors to do with ‘unmet dependencies‘ for libavcodec58)..
I eventually found that the ‘Legacy’ image of Debian Bullseye is what I needed, and Steam Link installed & ran without any messing (at first!).
If you’re looking for how to install steam link, check out Steam’s page here.
The interface looked fine, but when streaming a game, the image didn’t fit the TV properly. That was fixed by altering the Steam Remote Play options to ‘Change desktop resolution to match streaming client’;
The next problem was having no audio on the TV. Looking at the output it said ‘Mix_OpenAudioDevice() failed: alsa: Unsupported audio format‘.
The fix for this was to alter various settings in /boot/config.txt (maybe start with dtoverlay if you want to figure out exactly what fixes it for you).
$ sudo nano /boot/config.txt

------------------------------

# enable these
hdmi_force_hotplug=1
hdmi_force_edid_audio=1
hdmi_drive=2

# change this (add the 'f' to 'kms')
dtoverlay=vc4-fkms-v3d

# add this (stops Steam Link complaining.. nothing to do with audio)
gpu_mem=512
Reboot the Pi, then use sudo raspi-config -> System -> Audio and select HDMI.
You should find the audio now works & you should have a pretty good Steam Link streaming experience!!
One thing you may want to do is have the Pi automatically run Steam Link when it boots, to do this, use settings in raspi-config to automatically log the Pi into the console, then add this entry to crontab;
$ crontab -e

----------------

# add this to the file...
@reboot /usr/bin/steamlink
Congratulations! You should now have a Steam Link client on your Pi that works just as well as the Samsung app.
On 31st October 2023, the built-in Alexa integration with IFTTT stopped working with very little notice given to its users. This post show how you can replace IFTTT and get your Alexa Routines back up and working!
I don’t have a lot of time invested in a complex IFTTT setup, but we do use it to tell the kids that dinner is ready using this flow;
An Alexa Routine listens for, “Alexa, tell the kids dinner is ready”
The Routine calls an IFTTT Recipe
The IFTTT Recipe writes 2 text files to Dropbox containing commands to execute on the PC
The kids’ PCs, which use the same Dropbox account, have AssistantComputerControl monitoring the text files
As soon as AssistantComputerControl detects the text files it executes the command inside & deletes the file. In my case, it plays a sound telling the kids dinner is ready.
We can remove the Alexa Routine call to IFTTT by replacing it with a service called Voice Monkey. Voice Monkey has a lot more features, like being able to call a web service & have Alexa read out a response. I couldn’t do that with IFTTT!
If you still want to call a IFTTT Recipe, you can change the Recipe to be triggered by a HTTP request, then call that from your Voice Monkey Flow.
In my case, I wanted to remove IFTTT entirely from my workflow, so instead of having that write the text files to Dropbox, I did the same thing using an Azure Logic App, which I’ve blogged about before and have a video showing them in action here;
My new workflow is as follows;
An Alexa Routine listens for, “Alexa, tell the kids dinner is ready”
The Routine calls a Voice Monkey Flow
The Flow makes a HTTP call to a Logic App, then responds with a custom message for Alexa to read out.
The Logic App writes 2 text files to Dropbox containing commands to execute on the PC
Our 2 kids’ PCs, which use the same Dropbox account, have AssistantComputerControl monitoring the text files
As soon as AssistantComputerControl detects the text files it executes the command inside & deletes the file. In my case, it plays a sound telling the kids dinner is ready.
If you don’t need anything as fancy as Voice Money, you could try URL Switch, which is easier to set up, and lets you call any webservice/HTTP address. I gave that a go & it worked fine, but the options in Voice Monkey give a lot more flexibility & things to play with!
iOS 17 added support for UVC (USB Video Class) input devices, so that any iPad with a USB-C port can use an external camera, including USB capture cards.
This opens up a world of opportunities to use your iPad as a portable display for things like a game console (Xbox, PlayStation, Nintendo Switch), a device like the Raspberry Pi (making it very handy for debugging issues with a normally headless server), or even a $4 endoscope you can find on AliExpress!
Here are a couple of videos that show this feature in action;
Unless you’re just using a USB C endoscope, you’ll need a cheap HDMI capture dongle which you can plug into the iPad’s USB C port. The adapter I use is available here on Amazon; https://amzn.to/34xv7Lk
In my testing so far, the apps show very little latency and are great for playing games through.
In April 2023 123 Reg, a British domain registrar, sent out a notification that they’d soon be discontinuing catch-all email forwarding as of May 2023, and that I’d have to buy a ‘mailbox’ for about £28 per year, and enable catch-all forwarding on the mailbox instead.
I’ve been using 123 Reg for 15-20 years, and it was a big surprise that they’d now start charging for something so basic, especially since I’d literally just renewed my main domain with them for another 10 years for £150.
It’s worth saying up front that my setup with 123 Reg is really simple.. I just have the domain + email forwarding with them. My (very limited) web hosting is with Free Hostia, which just needs a A record adding in Advanced DNS. Other than that I have no other 123 Reg services to migrate; your situation may be different.
Thankfully these days it’s easy to transfer to another domain registrar, and ChatGPT came in handy for giving me a shortlist of British-based registrars offering free catch-all email forwarding.
After taking a look at each one (obviously ChatGPT isn’t up-to-date on the news of 123 Reg now charging for forwarding), I decided to try Fasthosts, and followed their domain transfer instructions on a secondary domain I have.
Before I initiated the transfer I took screenshots of all my settings on 123 Reg, just in case I needed to refer back to anything.
The transfer didn’t quite work as I expected when I selected the ‘Keep this domain’s current nameservers’ option, and after a quick Live Chat session with Fasthosts tech support (who were super-responsive), that got resolved. When I transferred my main domain I chose the ‘Use Fasthosts Nameservers’ option.
Once the transfer has gone through, you’ll need to click on the ‘Add Forwarding’ button to add the free web & email forwarding package;
After that’s been added, you’ll be able to configure catch-all email forwarding;
If you need to configure the domain to point at your web hosting, then you just need to add the A record, just like you did on 123 Reg.
And that’s pretty much it.
Hopefully that was useful for anyone else in the same boat as me; and if other companies end up doing this, the same steps can be followed to transfer to wherever doesn’t charge for this service.
After switching to a reconditioned Galaxy S21 Ultra which has no 3.5mm headphone jack, the prospect of moving to Bluetooth earbuds didn’t phase me; they’re cheap enough & the quality is pretty good.
However, I wanted to use my Boya BY-M1 lav mic (with 3.5mm jack) to record videos for YouTube, and therefore needed a 3.5mm to USB Type-C adapter. After rooting around on Amazon I found a couple with decent reviews; one at £8, the other £18.
They might be fine for listening, but both were a absolute disaster for recording audio! The cheaper one had a poor frequency range, so it sounded like I was talking through a cushion. The other had a good frequency range (similar to the internal mic), but a high amount of electrical noise.
Since then, I’ve tested a couple more adapters and have put together a series of video reviews to show you which ones to avoid, and which ones I’d recommend you buy.
Our team just started using Replicon to record our time off, but wanted to have a nice calendar widget on our SharePoint page (or wherever) rather than having to log into Replicon each time.
At first I tried their API, but struggled with permissions and getting any time-off data out of it.
However, I did find a more straight forward way.. through the iCalendar feed! I’m posting my solution here for anyone else who might want to do this with the minimum of effort (but it does need some effort! ;).
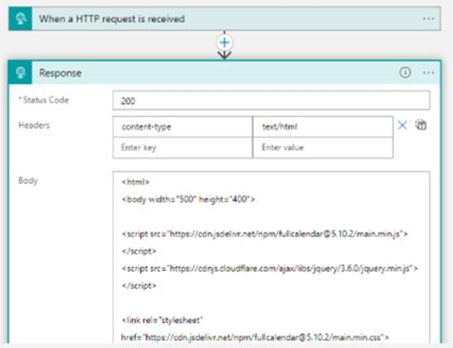
First off, you need to proxy the iCal data feed through something due to web (CORS) security.. so I’m doing that with a very simple Azure Logic App that grabs the feed & responds with the data.
Proxying the iCalendar Feed
This can then be consumed by our calendar JavaScript code, which takes the iCalendar data, reformats it to JSON, then tidies it to feed into a free JavaScript calendar called FullCalendar.
(you’ll need to edit the URL in the code to point at your iCalendar data proxy).
Once you’re happy with the code (in CodePen) you’ll need to host it on a webserver, then you can use the Embed component in SharePoint to get it onto your site page. To do this, I actually used another quick Azure Logic App, since it means I don’t need to have an actual web server.
I pasted all the code from the CodePen into a Response blog & boom, we have an easily-embedded calendar containing our team’s holidays!
Hosting the code in a Logic App
Hopefully this will help anyone else trying to do something similar, so you don’t have to start from scratch.
The Fire TV remote has a neat feature which lets you control other equipment like the TV or a soundbar. The list of manufacturers & devices it’ll control is massive.. but not all encompassing!
I bought an Edifier R1855DB (very similar to the R1850DB), and wanted to control it using the Fire TV remote.. which saves juggling 2 remotes (and the Edifier one is pretty cheap & feels like it could break at any moment!).
I soon found out that this particular Edifier model isn’t in the list of supported devices in the Fire TV equipment control feature which is really frustrating. There’s no route to get added to the Amazon list, nor does it have a ‘learn’ mode.
When I contacted Edifier they said “Our remotes use custom IR codes that can not be inputted into a universal remote”. And “information about the IR code is not open to the public”. Pretty ridiculous.
This is where I got curious about what IR codes the Edifier remote is sending out.. so I took a cheap Arduino Nano microcontroller and an IR receiver & wired them up on a breadboard. There’s an IR library with a bunch of examples, so I used the ‘IR dump’ code, uploaded it to the board & could instantly see the codes from the remote.
Capturing IR Codes
Apparently the Edifier R1855DB uses the NEC protocol, which is really common, and you can see the sequences it sends easily enough. I noted down the IR codes for each of the buttons I was interested in, and can now look at transmitting them!
You can get an IR transmitter for the Arduino .. at first I tried an IR LED from an old TV remote, but it needed a transistor to make it work properly, which I didn’t have. So I ended up buying a KY-005 IR module from eBay for £2.50.
KY-005 IR Module attached to the Arduino Nano
Hooking this up to the Arduino was simple, and I tested it was working using more example code from the IR Remote library. Finding the right format to play back the NEC codes I captured was a bit trial-and-error.. I eventually found the raw codes worked best. I actually used a Raspberry Pi with another IR receiver to validate the codes being sent were identical to the original remote.
What I can then do is have an IR receiver AND transmitter hooked up to the same Arduino and have it act as a translator between one manufacturers codes to another.
We can power the Arduino using the USB socket on the TV. This only powers up when the TV is on, which is quite handy.. and if it turns on, we can write some code to send the speaker power on IR command when the Arduino boots.
Here’s a quick wiring diagram, showing how everything is connected together;
Wiring Diagram
I didn’t have a cable long enough, so I took an old USB cable, cut it up, and soldered it into the IR transmitter so that I could place it near the Edifier IR receiver.. that was the most fiddly bit of this project.
Once I had that set up, I picked a supported device from the Fire TV equipment list – the Amazon Basics Soundbar – and dumped the IR codes for it from the Fire TV remote.
I then wrote some code to listen for the Amazon Basics Soundbar commands & emit a corresponding Edifier IR code. This worked an absolute treat after a bit of debugging. I even added a sequence detector so you can press Mute x2 then Vol Up to send the speaker power signal in case it somehow gets out of sync. Adapting the code to work with whatever equipment you have should be straightforward..
Altering the Arduino code for your equipment
You can build your own version of this for about £8, and it’s incredibly easy to put together, only requiring some basic electronics and coding skills.
Hope this has been useful.. let me know how you get on if you decide to build one of these yourself.
We have an elderly relative who, in the coming years, we expect have to keep a closer eye on. It’s not like we don’t have almost daily contact with them already, but having an early heads up of any mobility issues would be beneficial & give a degree of peace of mind.
Having a wifi-enabled camera installed is one option, but would be pretty intrusive, and I don’t want to have to watch it to figure out if there are any problems.
What I realised I needed was a Passive Infrared (PIR) movement sensor which could ping a service in the Cloud & alert me for anything out of the ordinary.
There are such solutions sold by a bunch of companies, but cost upwards of £100 and tend to have a subscription charge.
I started to think I’d roll my own solution using a development board and PIR sensor, but I remembered I actually have an old battery-powered PIR which activates a mains adapter (the idea is you’d maybe have a lamp in the socket for home security).
The adapter I have is from a company called Timeguard, but it’s about 15 years old and is obsolete.. they don’t have any current products of this type, but you can find similar ones on Amazon easily enough.
What I like about this, is that I can concentrate on the IoT piece, and let the adapter + sensor do their thing without worrying about the electronics.
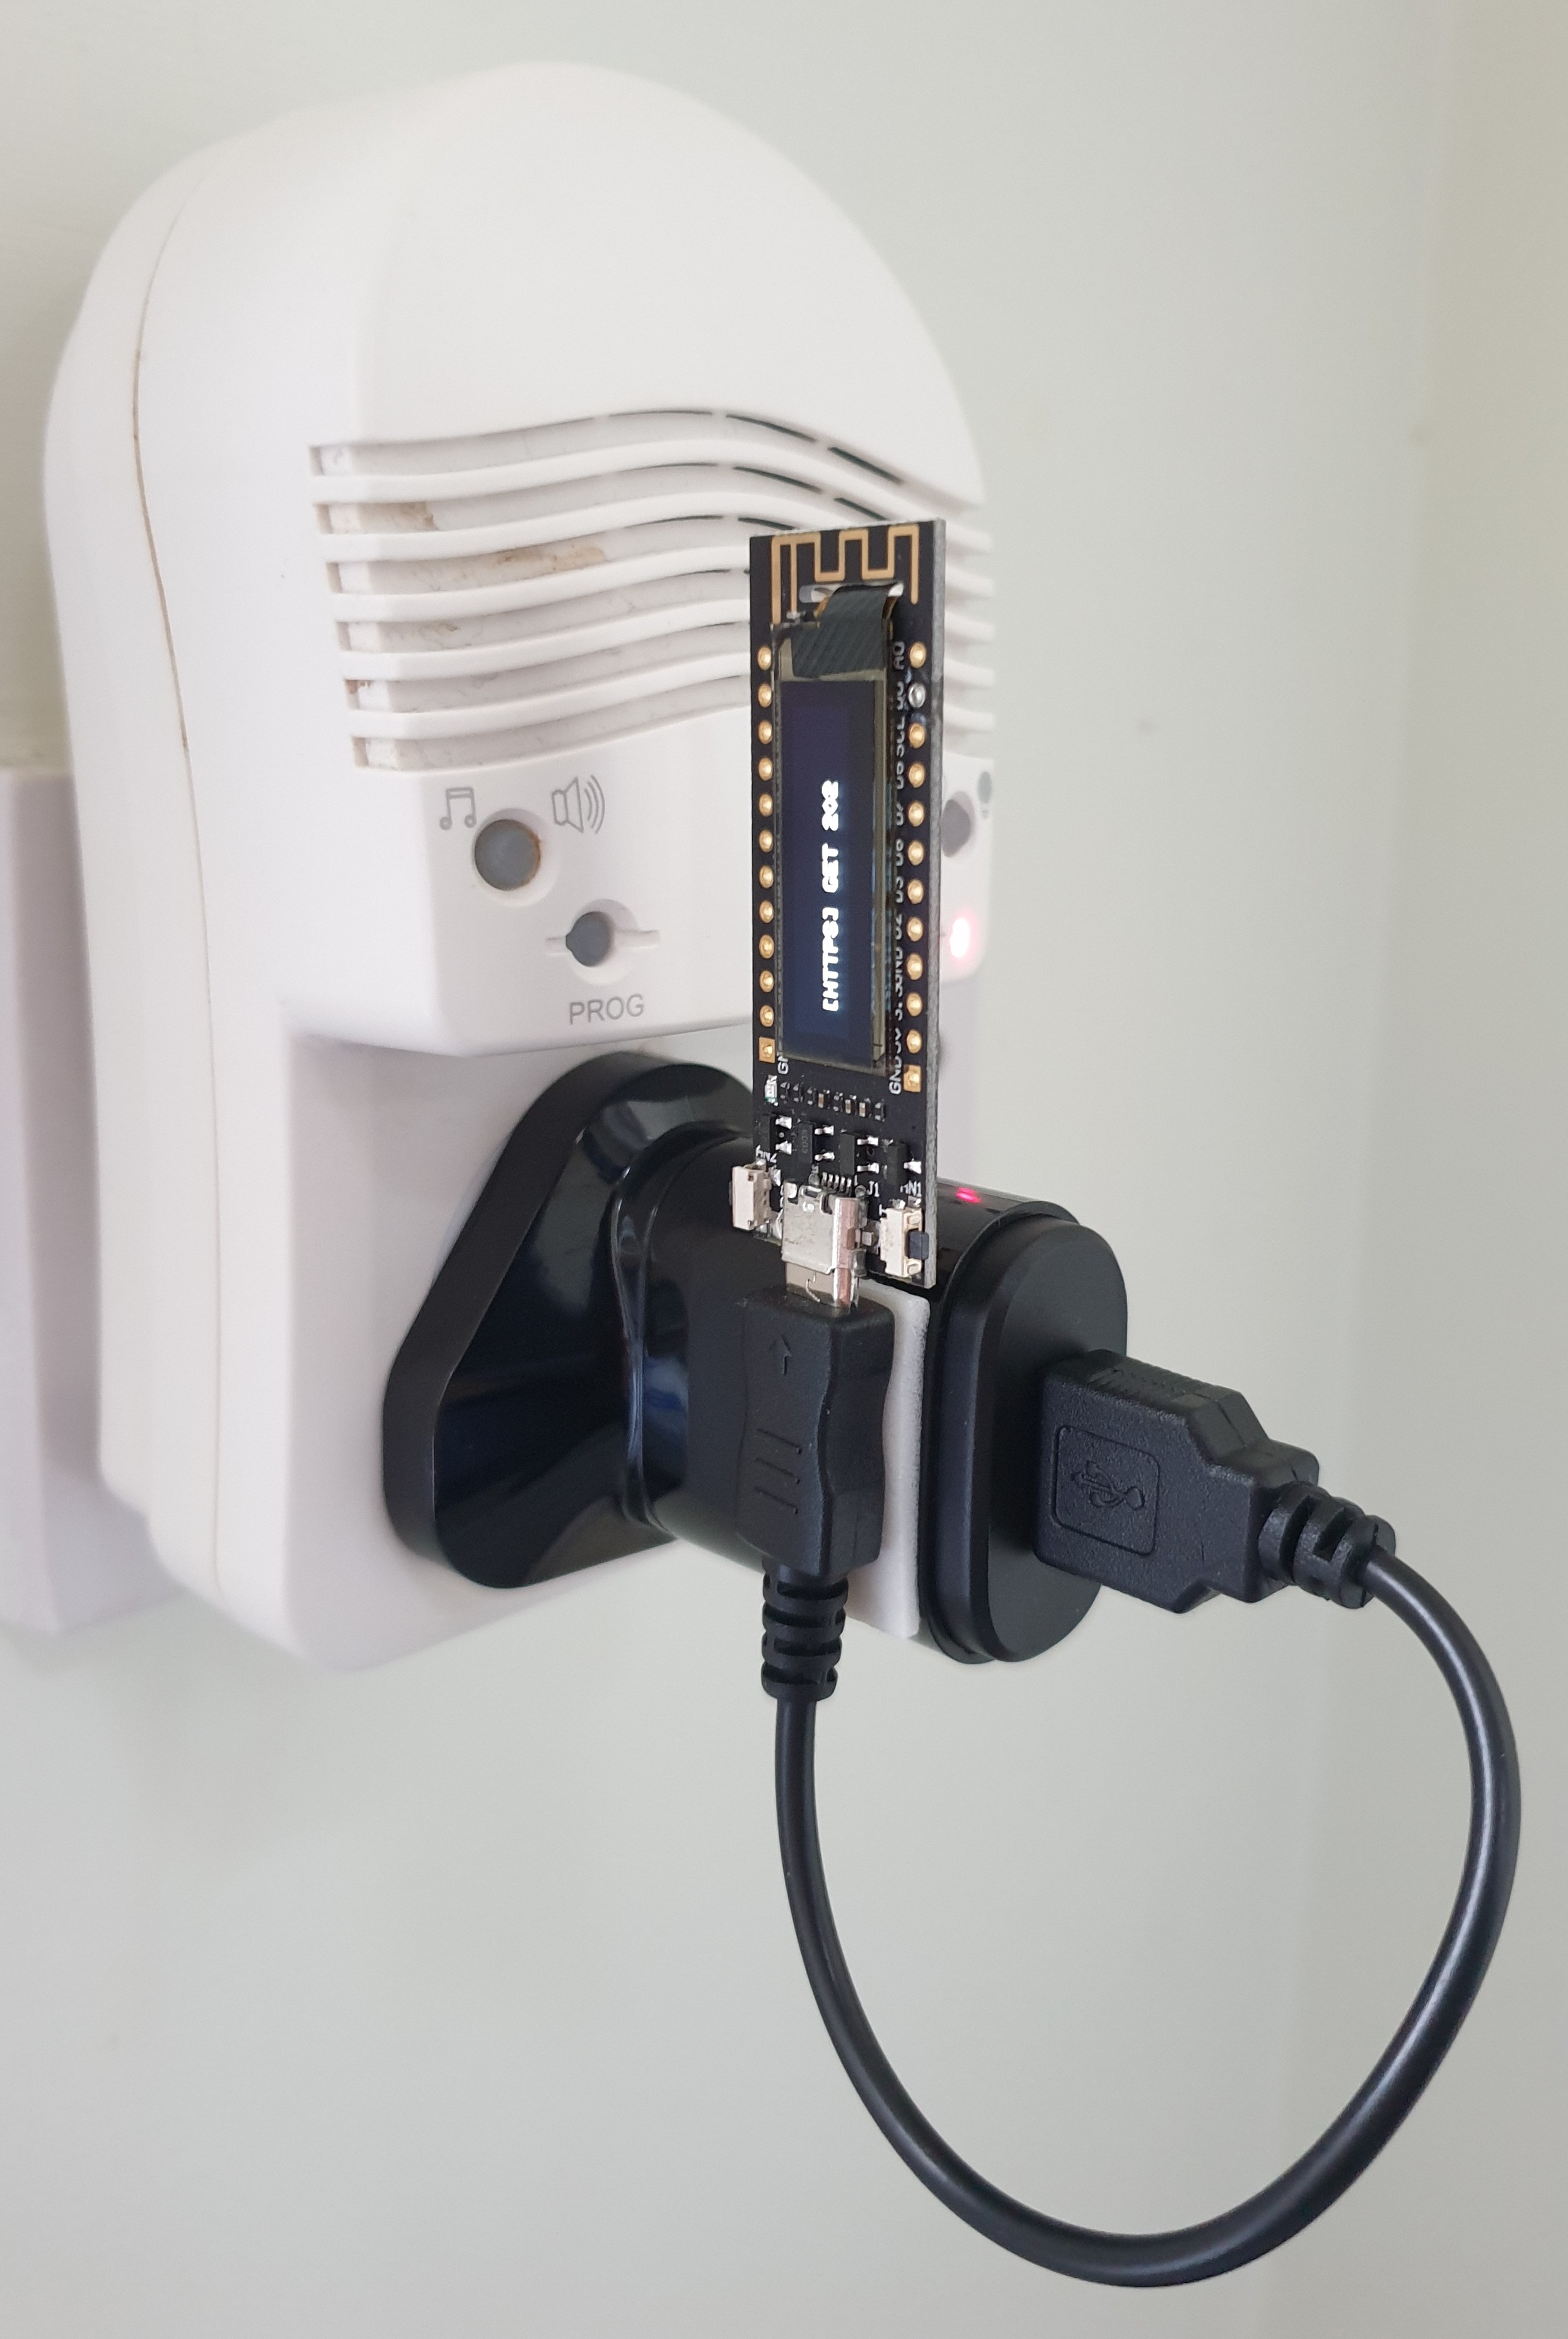
All I needed to do next was take a small ESP8266 board I had lying around and code it up to connect to the local wifi & call a URL.. which in my case will be an Azure Logic App. Logic Apps are great.. you can get them up and running very easily, at minimal cost, and without writing any code!
At first, the code for the ESP8266 just used the examples from the Arduino IDE. In very little time I had it connected to Wi-Fi and ready to make a HTTP call to wherever I wanted. However, I soon discovered the examples only worked with non-HTTPS sites (Logic Apps are HTTPS-only).
After a bunch of Googling, I found this library from gojimmypi on GitHub, which allows you to make HTTPS calls.
After switching to that & rewriting portions of the code, the board called the Logic App URL without issues and I received a 202 response (Accepted), and I could see the call in History;
Now we’re cooking! The motion sensor will activate the power adapter, which boots up the ESP8266 board, connects to wifi & calls Azure. The adapter will stay powered for 15s to 15min.. so having it set to 15 minutes means we’re not repeatedly powering the board & calling Azure (and incurring a load of cost).
The Logic App can do whatever we want to record the event.. update a table, or write a small text file with a timestamp.
Now we have that, we can have a secondary Logic App running on a schedule to monitor the events & alert us by email (or whatever) if it falls outside what we typically expect. For example, at 9am check that there’s been motion detected in the last 3 hours. If there hasn’t, send me an email so I can give the relative a quick call to check they’re ok.
With Azure, it’s always good to keep an eye on costs. In this case, lets look at the worst case scenario where we have a very active elderly relative who trips the motion sensor every 15 minutes from 7am to 11pm.. so that’s 16hrs x 4 = 64 possible calls a day.
Logic Apps cost you per Action block, and cost a bit more for Standard + Premium actions. In our case we have 1 trigger block and 1 standard block to write to a Storage Account (table or file).
The Azure cost calculator can then be used to figure out the monthly cost..
That’s a maximum of 21 pence (GBP) a month if it triggers every 15 min (which it won’t).. not bad!
We’ll also have the ‘event monitor’ Logic App, but that won’t run as often.. maybe every 4 hours starting at 9am, finishing at 9pm.. so that’s 4 times a day, with a few more action blocks in it to figure out what to do.. so maybe 10-15 blocks, 5 of which might be ‘Standard’…
As you can see, the monthly costs are minimal, and helps illustrate how useful Azure can be for something like this!
It took a few hours to put this all together & I’m pretty happy with the solution. We can put the battery-powered PIR sensor in somewhere like the kitchen, or hallway and be safe in the knowledge we’d get an alert if there wasn’t the level of activity we’d typically expect to see.
If you’re interested in the ESP8266 source, here it is;
This file contains bidirectional Unicode text that may be interpreted or compiled differently than what appears below. To review, open the file in an editor that reveals hidden Unicode characters.
Learn more about bidirectional Unicode characters
One of the pieces of tech I bought this year was a mirrorless APS-C digital camera which replaces an ageing Nikon D5000. I wanted something super-compact, but with interchangeable lenses & the ability to record 4K video.
Since were so many options, I started researching cameras & ended up creating a spreadsheet to record all the things I was interested in :)
Long story short, I chose the Fujifilm X-E3 due to the price-vs-features, and 8 months later I’m still happy with my choice; it produces some brilliant images, and is very portable for taking with me & the family.
Video is pretty decent from the camera, as long as you choose the right resolution & FPS. I’ve uploaded samples from the camera into a YouTube playlist for anyone who is interested it how the different modes look.
There are a few things that could be improved; adding 60 fps for 4K video, longer recording times (it’s limited to 10min at 4K, 15 min for 1080p, which is low these days), a dedicated ‘Record’ button (rather than having to dip into the Drive Mode menu to switch from Photo to Video), and a larger flippy screen on the back. Let’s see what the X-E4 brings in 2021!
Camera Bag
Next, if you’re looking for a really compact bag, I really like the Think Tank Mirrorless Mover 10, which is the smallest I could find that fit the camera + the 18-55mm lens. It’s also pretty cheap at about £20-30 (watch out for deals!).
Extra Batteries
There are plenty of cheap 3rd party batteries available; the ones I chose are from Baxxtar and I’ve had no issues with them at all.. performance is just as good as the one that came with the camera.
Companion App
If you get any newer Fujifilm camera, there’s a companion app available which allows you to connect your phone to the camera & do automatic synchronisation of the photos. It does this after you turn the camera off, and sets up an ad-hoc Wifi access point to do the transfer (Bluetooth is too slow). It’s pretty handy, since your photos all end up on your phone, which can then sync with Google Photos when you’re back at home, making the whole process quite seamless.
However, if you use this, one thing you’ll want to do is enable full-resolution files, since by default it downsizes everything to keep the transfer fast. Here’s how to do that;
Synchronise Videos to Your Phone
The Fujifilm app won’t transfer videos, so you’ll need to use some other apps to sync them automatically to your phone using a USB OTG adaptor & SD card reader. One of the apps is called FolderSync, and the other is Automate. Here’s how I use them to automate the process;
That’s it, I hope these tips have helped anyone with an X-E3, or anyone doing their research on what camera to buy.
Back in 2015, Yahoo! shut down a service I used to love called Yahoo Pipes. It allowed you to combine and filter XML-based RSS feeds to create a new RSS feed containing the data you wanted.
At the time, I looked for a decent alternative and didn’t find anything.. until I realised that Logic Apps (a Microsoft Azure resource) were actually comparable to a next-gen version of Yahoo Pipes, with A LOT more functionality.
Since Logic Apps / Power Automate (used to be called Flow) is a lot more feature-rich, it does mean it’s initially a little harder to do what you want with the data, but once you’ve developed a few, you’ll see how much more flexible they are, especially when the world has moved to JSON-based APIs, with XML-based RSS taking a backseat.
While Pipes would just output RSS, Logic Apps can output the result into pretty much anything you want.. JSON, email, other APIs, Twitter, spreadsheets (Office 365 and Google Sheets).. the list goes on and on!
You can get started with Logic Apps for free.. and they’re very low cost to run beyond the Azure trial period. You’re talking pennies to run them monthly, depending on run-frequency & complexity. The pricing calculator can help you if you’re worried about cost. If you created 10 Logic Apps, each containing 10 basic actions and 10 standard actions, and ran them all once a day for 30 days it’d cost you 34p a month;
Actions in Logic Apps are the blocks you see in a flow;
It starts with a ‘Trigger’.. so in this case I’ve chosen a Recurrence (schedule), but you could set one up to trigger on a HTTP call from an RSS reader app, something happening on Twitter, or pretty much anything.. here’s a few of the triggers to choose from…
Just some of the Trigger actions available!
Non-Microsoft products are well represented, so don’t go thinking you’re limited to SharePoint or Office 365, that’s not the case.
You then design the flow how you want it to behave, e.g. get data from X and Y, merge it together, filter it, query an API, persist some data in a sheet, then send back a piece of JSON.
Choose from Built-In, Standard or Enterprise actions.. you can even build your own custom connectors for systems that aren’t currently listed.
List of the Built-In actions (April 2020)
As you’ll see in the video I put together, to replace Yahoo Pipes, you need to be able to merge, filter, manipulate, and sort JSON. You can do a lot of this with the built-in actions, but you can use Inline Code to achieve anything else.
The one thing that’s Logic Apps aren’t great for compared to Yahoo Pipes is sharing what you’ve created.. it was really easy to adapt what someone else made to suit your needs. Logic Apps don’t work like that at all, and you’ll need to roll your own, which takes some trial-and-error & patience.
Basic filtering (etc) is quite straightforward …
… but Inline Code might take you longer to figure out, so to get you started, here are some Inline Code snippets you might find useful;
Simple Text Filter
This file contains bidirectional Unicode text that may be interpreted or compiled differently than what appears below. To review, open the file in an editor that reveals hidden Unicode characters. Learn more about bidirectional Unicode characters
This file contains bidirectional Unicode text that may be interpreted or compiled differently than what appears below. To review, open the file in an editor that reveals hidden Unicode characters. Learn more about bidirectional Unicode characters
This file contains bidirectional Unicode text that may be interpreted or compiled differently than what appears below. To review, open the file in an editor that reveals hidden Unicode characters. Learn more about bidirectional Unicode characters
This hasn’t been a step-by-step guide, but has hopefully shown you enough to spark your interest.. get yourself a free trial of Azure, and give it a go!
Alerts are great for letting you know when Logic Apps or Function Apps fail to run for any reason.. the problem is, while you can list out which resources have Alerts, you can’t get a list of resources which don’t have Alerts!
So how do you find out which resources you need to add Alerts to? Well, the CLI has the tools you need, but it’s a bit more complicated than it should be!
First you need a list of resources which have alerts.. you can do that with a command like this;
az resource list --output tsv --resource-type "Microsoft.Insights/metricAlerts" --query [].id
You can run that as part of this command, which is supposed to take the Alert ID list, pipe it into az resource show, and output the value in properties.scopes[0], which is the ID of the resource the alert is set up to monitor.
az resource show --ids $(az resource list --output tsv --resource-type "Microsoft.Insights/metricAlerts" --query [].id) --query properties.scopes[0] --output tsv
However, this fails miserably when the Alert name has a space in it; there ends up being a space in the Alert ID, which makes our command throw an error. UPDATE – Microsoft are figuring out if they can fig it in this bug report I raised.
What I ended up having to do is break up the commands inside a Bash script & use a loop.
This file contains bidirectional Unicode text that may be interpreted or compiled differently than what appears below. To review, open the file in an editor that reveals hidden Unicode characters. Learn more about bidirectional Unicode characters
This will assign all the Alert IDs to a variable, then replaces spaces with ‘SPACEFIX’. We then loop over the Alert IDs, querying the Alert to find what resource they’re monitoring. ‘SPACEFIX’ is replaced within the loop. It’s somewhat of a hack to get round this silly issue!
There might be a better way to handle this, but I didn’t find it in a hurry.
Now we’ve got a list of resources that have alerting enabled, we need to list out all the resources we want to check.. for this example I’m just interested in Logic Apps, and this script will list them out, one resource per line;
This file contains bidirectional Unicode text that may be interpreted or compiled differently than what appears below. To review, open the file in an editor that reveals hidden Unicode characters. Learn more about bidirectional Unicode characters
Now we can redirect the output of the 2 scripts into temporary files, and use the ‘comm’ command to show us the lines that exist in one file that don’t in the other.. here’s how it looks;
This file contains bidirectional Unicode text that may be interpreted or compiled differently than what appears below. To review, open the file in an editor that reveals hidden Unicode characters. Learn more about bidirectional Unicode characters
This gets us what we want.. a list of Logic Apps that don’t have Alerts set up for them. You can pipe the results through grep to check certain Resource Groups, or whatever you need.
Hope this helps save you some time, and gives you a few ideas for useful scripts.
I’ve published some videos on YouTube showing various Azure tips, which you might want to check out!


You must be logged in to post a comment.