Make your own £5 ambient TV backlight

After clearing out some junk, which included an old halogen desk lamp, I was thinking about putting in an LED light behind the PC monitor.

Then I remembered I’d bought a ring of 24 RGB LEDs from Aliexpress last year & hadn’t used it in a project.

I also had a spare Arduino Nano, and all the things I’d need to allow me to hook up a dial (potentiometer) for the light level, and button to cycle through different colour modes.

Here’s a quick video of it in action..

Parts

LED Ring – £2
Arduino Nano – £1.75
Breadboard & bits – £1.25
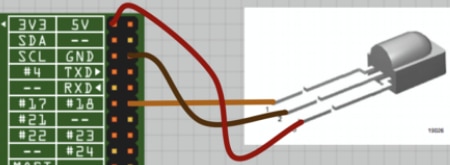
Wiring it up

It’s an easy one to wire up.. I took a few basic examples and mashed them together to get what I wanted from the design.

I’m not an electronics expert, and approached this like I approach software development; write it in manageable/testable chunks, which I can implement and test individually, then bolt it all together.

fritz-led-ring

The code for the project is pretty simple.. I think the most complicated bit is handling the button, which needed debounce functionality.


#include <Adafruit_NeoPixel.h>
#ifdef __AVR__
#include <avr/power.h>
#endif
#define PIN 6 // pin on the Arduino is connected to the LED ring
#define NUMPIXELS 24 // Number of pixels on the LED ring
#define POT_PIN 0 // Potentiometer pin
#define BUTTON_PIN 2 // Button pin
Adafruit_NeoPixel pixels = Adafruit_NeoPixel(NUMPIXELS, PIN, NEO_GRB + NEO_KHZ800);
int showType = 0;
bool oldState = HIGH;
void setup() {
pinMode(BUTTON_PIN, INPUT_PULLUP); // Declare pushbutton as input
pixels.begin(); // This initializes the NeoPixel library.
}
void loop() {
// Read the potentiometer value and translate to how many pixels we want to illuminate
int value = analogRead(POT_PIN);
value = map(value, 0, 1023, 0, 25);
// Switch colours if the button is pressed
bool newState = digitalRead(BUTTON_PIN);
if (newState == LOW && oldState == HIGH) {
delay(20); // Short delay to debounce button.
// Check if button is still low after debounce.
newState = digitalRead(BUTTON_PIN);
if (newState == LOW) {
// Cycle through different colour schemes
showType++;
if (showType > 8) showType=0;
}
}
oldState = newState; // Set the last button state to the old state.
uint32_t color = pixels.Color(255,255,255); // default to white when first booted
if (showType==1) color = pixels.Color(0,0,255); // blue
if (showType==2) color = pixels.Color(0,255,0); // green
if (showType==3) color = pixels.Color(255,0,0); // red
if (showType==4) color = pixels.Color(0,127,255);
if (showType==5) color = pixels.Color(255,127,0);
if (showType==6) color = pixels.Color(255,0,127);
if (showType==7) color = pixels.Color(0,255,255);
if (showType==8) color = pixels.Color(127,127,255);
// Illuminate X pixels depending on how far the potentiometer is turned
for(int i=0;i<NUMPIXELS;i++){
if (i<value) {
pixels.setPixelColor(i, color);
} else {
pixels.setPixelColor(i, pixels.Color(0,0,0)); // Don't show anything
}
}
pixels.show(); // This sends the updated pixel configuration to the hardware.
}

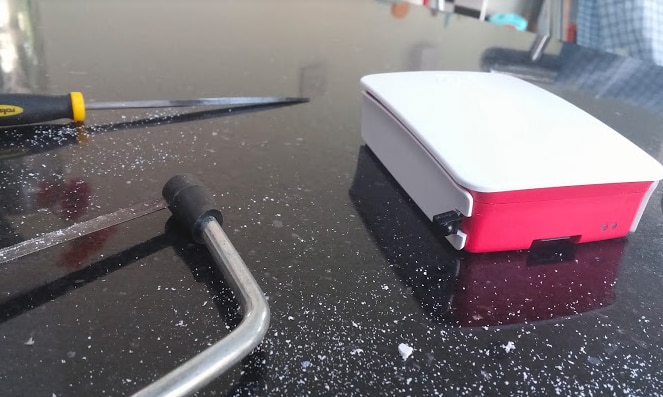
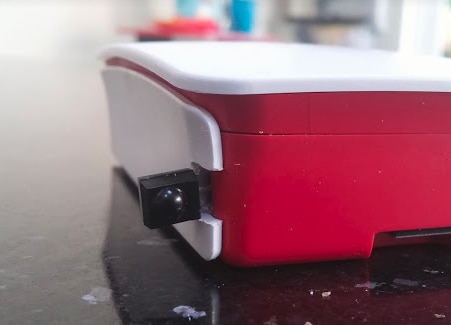
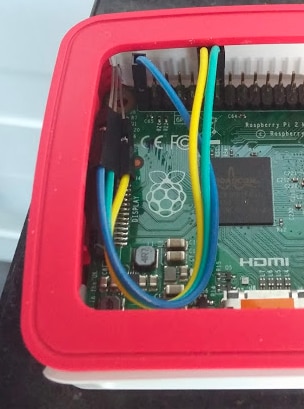
And here are a few pictures of it in place behind the PC monitor..

Automated mains socket power-off for OSMC on a Raspberry Pi

I’ve chosen to replace an ageing mini-PC which I’ve used since 2010 with a new Raspberry Pi 3 B+ running OSMC. It makes for a really capable media centre which can playback newer h.265 HEVC video files at 1080p without any problems, or it can serve 4K files over NFS to a box with a hardware h.265 chip like the Fire TV Box.

This form factor is easy to take on holiday and you can use an old infrared remote control (or Harmony learning remote) with it too.

However, the one thing I’ve struggled with is how to make it easy for my family to use in regard to switching it on and off. The Pi doesn’t have a power button. Some power supplies have an inline rocker switch, which almost fits the bill. I wanted something more automated.

Fortunately I had a spare Energenie power socket from a previous project where I use one to turn off our bass speaker when the TV isn’t on. These power sockets are controlled remotely (over RF) from a Pi which you attach an Energenie control board/shield to.

What I’ve done with the Pi 3 is have it powered through an Energenie socket, and set up a service that executes when it detects OSMC is shutting down. That service will make a quick HTTP call to the Pi with the Energenie controller shield, which will in turn send an RF signal to turn the mains socket off.


osmcshutdown


Here’s how you can set it up like I have…

Scripts for the Pi running OSMC

First, add a new service script.. create a new file in this folder;

/etc/systemd/system/callenergenie.service


[Unit]
Description=Energenie Remote Call to Secondary Pi
Before=multi-user.target
After=network.target
Conflicts=shutdown.target
[Service]
ExecStart=/bin/true
ExecStop=/bin/sh /home/osmc/callenergenie.sh
Type=oneshot
RemainAfterExit=yes
[Install]
WantedBy=multi-user.target

Then enable it with;

sudo systemctl enable callenergenie.service

There are a couple of useful things happening in this service, the After parameter makes sure the code runs before the network code is shut down, and Conflicts parameter is looking for OSMC shutting down.

Now add a helper script… this will make the webserver call as a background task, so control will be given back to the service immediately, rather than it waiting for the wget to complete.

/home/osmc/callenergenie.sh


echo Calling energenie socket…
wget –quiet –background –output-document="callenergenie.log" "http://192.168.1.99/callenergenie.php?delay=10&switch=2&state=off&quot;
echo Sleeping for 2 seconds
sleep 2
echo Done.
exit 0

This calls the PHP script, telling it which socket to turn off, and how long to delay before sending the command, which we’re doing so that the Pi has time to shut down before the power is cut.

Scripts for the Pi with the Energenie shield

This is the PHP script I added to the other Pi which was already configured to be a PHP web server.

/var/www/html/callenergenie.php


<?php
/* MattC – Call this with various parameters..
callenergenie.php?
delay = time in seconds to sleep before calling Energenie
switch = which socket to talk to
state = turn socket on/off
e.g. callenergenie.php?delay=5&switch=2&state=off
*/
print ("Waiting ".$_GET['delay']." seconds");
sleep($_GET['delay']);
print ("Switching socket ".$_GET['switch']." ".$_GET['state']);
exec("sudo python /var/www/callenergenie.py ".$_GET['state']." ".$_GET['switch']);
?>

To allow PHP to run the script as root, I needed to add the Apache user to the list of sudo-ers.. not that secure tho :( I’d be interested in anyone who knows how to run the Energenie scripts a regular user.. their Python doesn’t like it when it’s not root.

nano /etc/sudoers

www-data ALL=(ALL) NOPASSWD:ALL

The nice thing about the PHP script is that we can actually call it to turn the Pi on remotely too.. so you could configure that into a widget on your phone, or add it to Alexa.

Adding IR Remote Control Support to the Raspberry Pi

In my last post I took you through how I created a small portable media centre that I can easily take on holiday to hook up to the hotel TV.

To reduce the amount space it took up, I used a cheap USB keypad which could be used to control the media center. It worked really well & having something hard-wired meant I didn’t have to worry about a Bluetooth-paired device needing re-pairing.

However, what I then realised was it would be good to be able to use a spare remote control instead. I was using the OpenElec distribution and looked through their documentation for how to do this, but only found references to version 3 of the software (it’s on version 7) and how to get LIRC working with it. There were plenty of blog posts on hooking up IR support, but a lot of them were written 2-3 years ago, and the software has moved on somewhat.

Hardware Setup

What I did first was buy a suitable IR receiver. I chose the Vishay TSOP4838 (which costs less than £1) because of the voltage range (2.5-5.5v) and receiver frequency (38KHz). If you look at the datasheet for the product, you’ll see which pins should get wired up to the Pi;

Simply wire pin 1 to GPIO 18, pin 2 to GND, and pin 3 to a 3.3v power pin, e.g.

By using some short F-F jumper wires and a small cut in the side of the case, I was able to position the reciever neatly(ish) on the side.. it’s still easily removable, but you could integrate it into the case a bit more seamlessly than this ;)

Software Setup

Before this project I was using OpenElec, but had limited success getting the IR support working properly. I switched to OSMC which I’d read had better IR support through the main UI. I think I was actually on the right track with OpenElec, but I realised later that the old vintage Xbox remote I was trying to use wasn’t 100% working.

If you’re going to use a remote control that’s officially recognised, then you can jump this part about learning IR remote control codes.

Learning IR remote commands

The remote I found in the loft was an old DVD player remote which (unsurprisingly) wasn’t in the list of pre-recognised remotes in the OSMC installation. I needed to get the Pi to learn the IR pulses being sent out by the remote and map them to the Kodi functions.

1. First off, you need to telnet to the Pi. Username: osmc, Password: osmc.

2. Next you need to stop the LIRC service which is being locked/used by Kodi

sudo systemctl stop lircd_helper@lirc0

3. Now you can run the IR learn mode.. this will record what it finds to the config file you specify;

irrecord -d /dev/lirc0 /home/osmc/lircd.conf

4. Follow the on-screen instructions which will recognise your remote.

One observation I had was that this only worked properly if I stopped after the first prompt to press lots of keys on the remote.. if I completed the second stage, the key mapping didn’t work, e.g.

If I ignored the second phase & let it abort, the learn process worked

When it’s working, you’ll be able to enter the Kodi function (like KEY_UP, KEY_DOWN, etc) & map it to a key press on your remote;

Once you’ve mapped all the functions you want, we then need to move back to OSMC and tell it to use that config file we’ve just written.

OSMC Settings

In OSMC you need to do the following;

1. Disable the CEC service (via System Settings > Input > Peripherals > CEC Adapter), which seems to be needed for LIRC to work.

2. Now go into OSMC settings and pick the Raspberry Pi icon

3. Go into Hardware Support and enabled LIRC GPIO Support. You shouldn’t need to change anything if you connected the sensor to GPIO 18.

4. Now go back and select the Remote Control option.

5. Ignore the list of pre-installed remotes and select Browse;

6. Navigate to the folder where LIRC wrote your config file;

7. Confirm the change & reboot the box;

That should be it.. your remote should be able to control everything in Kodi.

Foscam FI8910W Review, Unboxing, and tips

foscam Over the past 3 years I’ve had the Edimax IC-1310 working in my home without many problems. It’s great to be able to monitor the house when I’m away & know that I’ll not have any nasty surprises when I get back.. well at least from a living room point-of-view.

The Foscam range of webcams caught my eye, specifically the FI8910W which can use a wireless network connection, and is steerable. I like the fact that this gives it a lot of placement flexibility.. just needing a power source & off it goes. This newer model has an IR-Cut filter which gives better colour reproduction from it’s predecessor. I paid about £65 for the white version from the official UK-based Foscam distributor; there was a 10% coupon code floating around on the web, which brought the price lower than Amazon.

Here’s what’s in the box;

Initial setup of the camera is supposed to include you installing some Windows app to find the camera’s IP address on your network; my router gives me a list of connected devices, so I chose to forego the app and use the router’s info instead. I could log into the camera once I had it’s IP address, and configured it to connect over wifi, altering a few other settings as I went (disabling the DDNS service, since my Edimax camera is already updating dyndns.org with my externally visible IP).

As long as you’re used to fiddling with things like port forwarding you’ll have everything set up within 10-15 minutes; there’s not a lot to it & these days it’s handy to have a phone on 3G to check things are working correctly. I added a few extra user accounts, and had TinyCam Monitor for Android working in no time at all.. specifying the local network IP on the main settings, and the DynDNS address on the extra 3G settings page.

Being able to steer the camera is really handy.. when you have it pointing in the right direction, you can save it as a preset, both from your browser, or from an app like TinyCam Monitor. I’ve set mine to mostly look out of the back window, but can swivel it round to look into the kitchen & hallway.. even up to the skylights, etc.

The quality of the images is pretty decent, but at 640×480, they’re not exactly HD quality. Motion detection is a tad limited.. even compared to my 3yr old Edimax. There’s no way to specify zones for motion detection, and it only uploads 2 .jpeg files for each motion capture event (the Edimax can upload 5 second videos!).

Annoyingly, even if you turn off the IR LEDs, they’ll switch back on the next time the camera is rebooted.. which is a real pain when the camera is looking out of a window (you only see the bright glare of the LEDs shining back at you!). Hopefully that’ll get fixed in a future firmware update, but I’m not betting on it. Talking of firmware, make sure you upgrade it.. the latest versions include some (unspecified) security fixes.

Overall, I’m still impressed with the camera.. the price point is just right when you compare it with the features and annoying niggles.

For anyone who wants a direct URL to a jpeg snapshot from the camera, then this is the correct URL format;

http://your-external-ip:port/snapshot.jpg?user=whoever&pwd=letmein

That should be handy for anyone who has a HTML dashboard page, or a desktop widget that accepts webcam image URLs.

And here’s a sample image from the camera as it points out of my back window.. a window that needs a clean! And yes, that’s a sink plunger on the patio.. for some bizarre reason the kids enjoy playing with this more than the billion toys they’ve got ;)

Foscam FI8910W snapshot

Bluetooth audio A2DP receiver BTR006 review

We have a tablet that we put in a headrest mount for the kids to watch on longer journeys. In the past I attached an FM transmitter so that audio could be fed through the car stereo, and I could control the volume from the dash. The only problem with that was local radio stations in other regions stomping over the FM signal I’d pre-set earlier in the journey.

I bought the Bluetooth audio receiver from Justop. It’s the BTR006 model which apparently has some updated chipset. It’s about £15 on Amazon.

This tiny unit draws power from its built in li-on battery (or any USB port) and when fully charged will allow for 8-10 hours of use, and something like 250 hours of standby.

It was easy to pair up with my Samsung Galaxy S3, and Blackberry Playbook.. both of which will be using A2DP. The signal travels 5-10m without problems, but at extremes, the signal gets scrambled by walls/people. For my use, which is for in the car (tablet with the kids in the back) it works a treat.

The only thing I don’t particularly like is the tiny power socket which uses some non-standard plug instead of micro or mini USB. That’s a real pain when I have loads of micro USB-ended adapters kicking around.

ASUS RT-N56U Wireless Router Review

The Belkin 54G wireless access point I’ve been using for a few years has been suffering since we extended the house.. there’s just not enough range on it, and it tends to temporarily lock up if it’s hammered a lot.

Finding a replacement took a lot of research, but I eventually decided on the ASUS RT-N56U, costing about £85, after reading some great reviews, including one in PC Pro. It’s worth reiterating that it doesn’t contain an ADSL router.. so if you’re on that type of broadband you’ll still need one of those in your set up. I’m happy with that, since the master socket isn’t where I want to place the wireless router anyway.

Configuration was straight-forward, aided by a decent web interface. As soon as I plugged it in I upgraded the firmware to the latest version from ASUS. I’d also seen that there are unofficial firmwares from a Russian group which are meant to fix a bunch of stuff & add new features. I’m sticking with the ASUS firmware unless I hit stability problems or find that I want to tinker later on. I certainly like the option to have a customised firmware should the need arise.

After having it running for a few days I’m really impressed with the speed and coverage across the house. It allows you to either use one SSID for 2.4Ghz and one for 5Ghz.. which lets you decide which band you want a device to use. Or set the same SSID for both, and it’ll automatically switch you over to the fastest band according to the signal strength. I was in the kitchen, and it connected on what must have been the 2.4Ghz band (due to the distance), then moved to the living room where the speed shot up & was obviously using the 5Ghz band.

Here’s a table showing how the signal strength has been affected by the upgrade;

Signal Strength (dBm)
Postion ASUS Belkin
Utility Room -70 -75
Kitchen Diner -76 -85
Lounge -45 -63
Bedroom -61 -75
Bathroom -76 -85


And here’s my unboxing video;

Blackberry Playbook: Bargain 7″ Tablet

In the last few weeks the price of the Blackberry Playbook has plummeted further, to £169 in the UK from retailers such as PC World. At that price it deserved some research into what it offers & whether it’s worth a look. The tablet itself is solidly built, with a decent amount of processing power & good multi-tasking abilities. There’s an app store that offers a fair number of apps, including the obligatory Angry Birds, Plants vs Zombies, and useful stuff like free VNC clients.

The 7″ screen looks crisp & vivid, and isn’t as cramped as I’d imagined it would be. I’d viewed someone’s Samsung 7″ tablet so knew what to expect. Browsing the web on it is slick & fast, plus it’ll play Flash videos, so iPlayer, 4oD and other sites all work on it without a hitch.

The OS is soon to get v2.0, and that’s where things get even more interesting; that opens the Playbook up to the Android Market, allowing it to run a majority/proportion (not sure which yet!) of Android apps. OS2.0 will also offer MKV support, but what codecs are actually covered is unclear.

Built-in storage is limited to what you initially purchase (e.g. 16Gb), and there’s no SD card expansion. However, if you root the Playbook, there’s a method to add USB-host functionality, allowing you to attach USB flash drives.

A micro-HDMI connector allows it to mirror the display to a TV without proprietary adapters & it just works!

Here’s what you need if you want to hook it up to a TV (a few different cable lengths included):

Micro HDMI to HDMI adapter = £3.56

0.5m standard HDMI lead = £1.18
1.0m standard HDMI lead = £1.14
5.0m standard HDMI lead = £3.19

And here’s what you’d need to connect a standard USB flash drive

Micro USB to USB adapter (270 angle means it doesn’t clash with HDMI output) = £3.17
USB Female to Female adapter = £1.14

For the back of the car, I’ve gone for a generic headset mount that can also mount an iPad:

Universal tablet mount

And to protect it from scratches and minor droppage in the house I bought the official faux leather convertible case, which beats the hell out of the horrible case it ships with.

Faux Leather Convertible Case

After a few hours of research I knew it was a good deal, bought one & haven’t been disappointed. It *is* a bargain for what you get :)

iPhone and Android development with Titanium

Over the past few months I’ve worked on a couple of mobile applications for the iPhone and Android platforms. I’d looked at Phonegap some time before that, but determined that it wasn’t up to the job, but more recently I stumbled across Titanium from Appcelerator. The idea is that you code up your apps using HTML and Javascript. The Javascript calls the Titanium API to create things like lists, dialog boxes, and phone features such as geolocation.

Some of the advantages of using Titanium are:

– No need to learn Objective-C (iPhone) or Java (Android)
– Leverage existing HTML + Javascript skills
– Write one version of the code that can be deployed to both platforms
– Code is compiled up into native applications which are accepted in the App Store
– Potential to deploy to other platforms in the future (e.g. Blackberry, Symbian)

The level of support provided by the Appcelerator staff on the official forums is brilliant, and the tutorial videos are good for those who want to get an overview of creating apps without wading through documentation.

You’ll still need a Mac if you want to develop for the iPhone, because Titanium makes use of the iPhone SDK. But if you just want to do Android development then you can use Window or Linux as well.

Although you’ll be developing 1 set of code for both the iPhone and Android, you’ll probably want to customise the UI slightly differently for each platform. For example, Android apps often hide away items such as ‘Settings’ and ‘Help’ under the Menu button. It’s simple to code this kind of thing up:

	if (Titanium.Platform.name == 'android') {
		var menu = Titanium.UI.createMenu();
		menu.addItem("Help/About", function() {
			displayWindow('Help / About', 'window_about.html');
		}, Titanium.UI.Android.SystemIcon.HELP);
		Titanium.UI.setMenu(menu);
	} else {
		data.push({title:'Help / About',image:'tabicon_help.png', color:'#ffffff'});
	}

That code will create the Help/About option under a menu on Android, and add it to the home screen’s list on the iPhone. Simple.

Titanium is an awesome framework so if you’re considering developing for the iPhone and/or Android then I’d highly recommend you take a look.

Power Meter Plus 1.6 Released

This release of Power Meter Plus – the popular replacement for the standard Windows power meter – adds 4 new features/settings. These have been added after feedback from users.. a lot after it was featured on Lifehacker.com and in PC Pro magazine :)

The features/settings now available are:

  • Hide the meter instead of switching sides.. it then fades back a few moments later
  • Change the transparency level of the message that appears across the screen for certain warnings
  • Flash the warning message (optional)
  • Start the meter on the right of the screen (which is where it will stay if you set it not to move sides)

Click here for the Power Meter Plus download page.

Power Meter Plus

Power Meter Plus in PC Pro Magazine

pc-pro-logo Power Meter Plus has been getting a lot of coverage this month; it’s been mentioned on dozens of blogs and now in PC Pro magazine issue 172, in fact I think Lifehacker might have picked up on it from there & the blogs picked up on Lifehacker’s article.

pcpro-jan-2009

Power Meter Plus featured on Lifehacker

Lifehacker is one of my daily visits, so it was brilliant to see that it had Power Meter Plus as the Featured Windows Download :-D

Power Meter Plus 1.5 Released

This release of Power Meter Plus – the popular replacement for the standard Windows power meter – fixes a bug with widescreen monitors.

Click here for the Power Meter Plus download page.

Power Meter Plus

Netvibes UWA

Netvibes is a pretty awesome personal homepage web app. It’s very similar to iGoogle, but IMO it’s a lot more stable & a lot better looking. Netvibes offer a unified API that allows you to write using their API and deploy your gadget to multiple providers, such as iGoogle, Opera, iPhone, MacOSX and Vista.

I’ve been writing a gadget for my company but decided I also wanted one to take the first image out of an RSS feed and present so that it takes up all the space in the gadget. Useful for things like LOLcats. It was surprisingly simple to create.. so with some UWA coding, and a simple pipe at Yahoo Pipes, I’m now able to bring in the first image from a specified RSS feed.. assuming the image’s URL has been put into the item.content tag.

Here’s the finished gadget.. and the source code is below…

<?xml version="1.0" encoding="utf-8"?>
<!DOCTYPE html PUBLIC "-//W3C//DTD XHTML 1.0 Strict//EN" "http://www.w3.org/TR/xhtml1/DTD/xhtml1-strict.dtd">
<html xmlns="http://www.w3.org/1999/xhtml" xmlns:widget="http://www.netvibes.com/ns/"  >
	<head>
		<title>Single Image Display</title>
		
		<meta name="author" content="Matt Collinge" />
		<meta name="author_email" content="gadget@mattcollinge.co.uk" />
		<meta name="description" content="Display an image from the content section of the first item in an RSS feed. Useful for feeds like those from LOLCats. Use Yahoo Pipes to get the image URL (only) into the item.content tag." />
		<meta name="version" content="1.1" />
		<meta name="website" content="http://www.mattcollinge.co.uk/" />
		<meta name="keywords" content="image, rss, lolcats, single, full width" />
		<meta name="autoRefresh" content="15" />
		
		<link rel="stylesheet" type="text/css" href="http://www.netvibes.com/themes/uwa/style.css" />
		<script type="text/javascript" src="http://www.netvibes.com/js/UWA/load.js.php?env=Standalone"></script>
		
		<style type="text/css">
			.imageDisplay {
				margin:0;
				padding:0;
			}
		</style>
		
		<widget:preferences>
			<preference name="title" type="text" label="Title" defaultValue="Single Image Display" />
			<preference name="url" type="text" label="URL" defaultValue="" />
		</widget:preferences>
	
		<script>
			var BasicRSSReader = {};
			 
			BasicRSSReader.feed = false;
			 
			widget.onLoad = function() {
				if (widget.getValue('url') === '' || widget.getValue('url') == undefined) {
					widget.setBody('Please edit the preferences and enter the URL of the RSS feed where you want to take the image from.<br><br>The image URL must be in the item.content tag otherwise this will not work. Use feed a reformatter like Yahoo Pipes if you need to tinker with a 3rd party RSS feed such as LOLcats.');
				} else {
					widget.body.addClassName('imageDisplay');
					widget.setTitle(widget.getValue('title'));
					UWA.Data.getFeed(widget.getValue('url'), BasicRSSReader.display);
				}
			}
			
			BasicRSSReader.display = function(feed) {
				var feedList = 'Unable to load feed.';
				if (feed) BasicRSSReader.feed = feed;
				var item = BasicRSSReader.feed.items[0];
				feedList = '<img src="' + item.content + '" width="' + widget.body.getDimensions().width + '" />';
				widget.setBody(feedList);
			}
		</script>			
	
	</head>
	<body>
		<p>Loading...</p>
	</body>
</html>

Using JSLint with Notepad++

I’m doing a fair amount of development using the ExtJS framework. IE is a bit picky about getting JavaScript properly formatted (otherwise it refuses to render the page). That’s why I’ve found JSLint really useful for locating stray commas or semi-colons.

To make it a bit quicker to put the file contents in the JSLint box I decided to hook it up to the Run menu in Notepad++. However, the JSLint web page doesn’t allow us to pass in data to it. To get around this you can copy the HTML + JS files from the authors website an copy them locally. Once you’ve got them locally you can modify the source to allow the passing of data.. here’s the change I made to do it on my system:

jslint.php changes.. add this right near the end

<script src="javascript.js"></script>

You’ll then need a way to take the file contents and fire it off to the page. At first I tried passing the file contents via the GET request, but it’s limited in length. Also, Notepad++ won’t let you send the file contents via the Run command. In the end I chose to use a piece of VBScript to bring up the webpage in the default browser, and some JavaScript to read in the file & place it into the page.

launchJSLint.vbs

Set objFSO = CreateObject("Scripting.FileSystemObject")
Set objFile = objFSO.OpenTextFile(wscript.Arguments(0), 1)

Dim strCharacters

Do Until objFile.AtEndOfStream
    strCharacters = strCharacters + objFile.Read(1)
Loop

strCharacters = Escape(strCharacters)

Set objFileSystem = CreateObject("Scripting.fileSystemObject")
Set objOutputFile = objFileSystem.CreateTextFile("c:\progra~1\notepad++\jslint\javascript.js", TRUE)
objOutputFile.WriteLine("document.getElementById(""input"").value = unescape(""" & strCharacters & """);")

Dim wShell
Set wShell = CreateObject("WScript.Shell")
wShell.Run "c:\progra~1\notepad++\jslint\jslint.html", 9

Finally, this is the Run command you can use in Notepad++ to launch the script…

wscript "C:\Program Files\Notepad++\launchJSLint.vbs" "$(FULL_CURRENT_PATH)"

Using OpenDNS with the O2-supplied Router

One thing that O2 didn’t put into the web interface for the Thomson TG585 wireless routers they supply you with, is a way to change DNS servers. It’s therefore a bit of a pain if you want to use OpenDNS. Luckily it’s not that hard to make the changes via a telnet connection:

telnet 192.168.1.254
Login name: SuperUser
Password: O2Br0ad64nd

Now make a note of your existing DNS setup using this command:

dns server route list

It’ll give you something like this;

DNS Server Entries:
  DNS Server     Source  Label   Metric Intf         State  Domain
D 87.194.0.53                    10     O2_ADSL       UP      *
D 87.194.0.52                    10     O2_ADSL       UP      *

The ‘Intf’ column is the type of connection you have (yours might differ from mine).. you’ll need this for the next commands;

dns server route flush
dns server route add dns=208.67.222.222 metric=0 intf=O2_ADSL
dns server route add dns=208.67.220.220 metric=0 intf=O2_ADSL
dns server route list
saveall

That’s it. Release and renew your IP address on all connected equipment and you’re all set.